Additional Configuration
Configure SSH passwordless
By default, COMPSs uses SSH libraries for communication between nodes. Consequently, after COMPSs is installed on a set of machines, the SSH keys must be configured on those machines so that COMPSs can establish passwordless connections between them. This requires to install the OpenSSH package (if not present already) and follow these steps on each machine:
Generate an SSH key pair. When asked for password field leave it empty.
$ ssh-keygen -t rsa
Distribute the public key to all the other machines and configure it as authorized
$ # For every other available machine (MACHINE):
$ scp ~/.ssh/id_rsa.pub MACHINE:./myRSA.pub
$ ssh MACHINE "cat ./myRSA.pub >> ~/.ssh/authorized_keys; rm ./myRSA.pub"
Check that passwordless SSH connections are working fine
$ # For every other available machine (MACHINE):
$ ssh MACHINE
For example, considering the cluster shown in Figure 5, users will have to execute the following commands to grant free ssh access between any pair of machines:
me@localhost:~$ ssh-keygen -t rsa
# Granting access localhost -> m1.bsc.es
me@localhost:~$ scp ~/.ssh/id_rsa.pub user_m1@m1.bsc.es:./me_localhost.pub
me@localhost:~$ ssh user_m1@m1.bsc.es "cat ./me_localhost.pub >> ~/.ssh/authorized_keys; rm ./me_localhost.pub"
# Granting access localhost -> m2.bsc.es
me@localhost:~$ scp ~/.ssh/id_rsa.pub user_m2@m2.bsc.es:./me_localhost.pub
me@localhost:~$ ssh user_m2@m2.bsc.es "cat ./me_localhost.pub >> ~/.ssh/authorized_keys; rm ./me_localhost.pub"

me@localhost:~$ ssh user_m1@m1.bsc.es
user_m1@m1.bsc.es:~> ssh-keygen -t rsa
user_m1@m1.bsc.es:~> exit
# Granting access m1.bsc.es -> localhost
me@localhost:~$ scp user_m1@m1.bsc.es:~/.ssh/id_rsa.pub ~/userm1_m1.pub
me@localhost:~$ cat ~/userm1_m1.pub >> ~/.ssh/authorized_keys
# Granting access m1.bsc.es -> m2.bsc.es
me@localhost:~$ scp ~/userm1_m1.pub user_m2@m2.bsc.es:~/userm1_m1.pub
me@localhost:~$ ssh user_m2@m2.bsc.es "cat ./userm1_m1.pub >> ~/.ssh/authorized_keys; rm ./userm1_m1.pub"
me@localhost:~$ rm ~/userm1_m1.pub

me@localhost:~$ ssh user_m2@m2.bsc.es
user_m2@m2.bsc.es:~> ssh-keygen -t rsa
user_m2@m2.bsc.es:~> exit
# Granting access m2.bsc.es -> localhost
me@localhost:~$ scp user_m2@m1.bsc.es:~/.ssh/id_rsa.pub ~/userm2_m2.pub
me@localhost:~$ cat ~/userm2_m2.pub >> ~/.ssh/authorized_keys
# Granting access m2.bsc.es -> m1.bsc.es
me@localhost:~$ scp ~/userm2_m2.pub user_m1@m1.bsc.es:~/userm2_m2.pub
me@localhost:~$ ssh user_m1@m1.bsc.es "cat ./userm2_m2.pub >> ~/.ssh/authorized_keys; rm ./userm2_m2.pub"
me@localhost:~$ rm ~/userm2_m2.pub
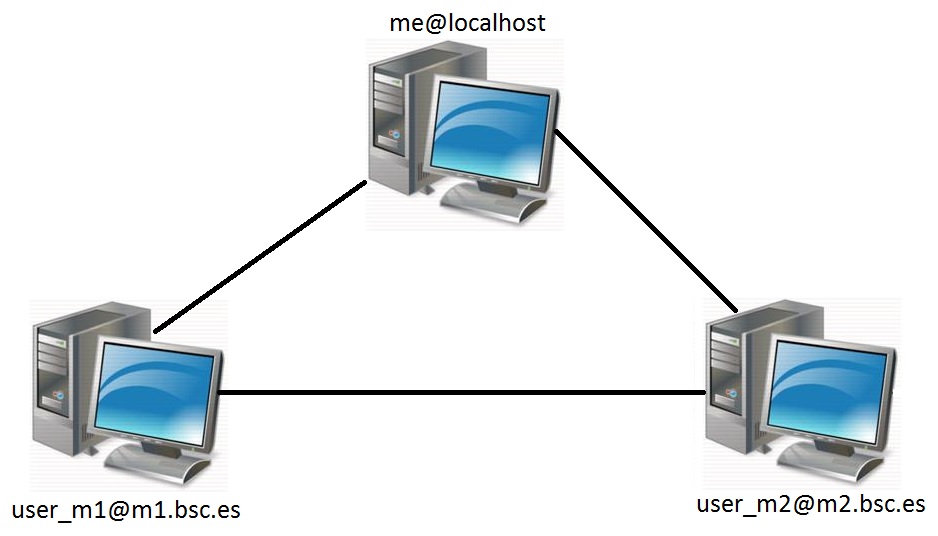
Figure 5 Cluster example
Configure the COMPSs Cloud Connectors
This section provides information about the additional configuration needed for some Cloud Connectors.
OCCI (Open Cloud Computing Interface) connector
In order to execute a COMPSs application using cloud resources, the rOCCI (Ruby OCCI) connector 1 has to be configured properly. The connector uses the rOCCI CLI client (upper versions from 4.2.5) which has to be installed in the node where the COMPSs main application runs. The client can be installed following the instructions detailed at http://appdb.egi.eu/store/software/rocci.cli