Usage
The pycompss-cli package provides the pycompss command-line tool. Note that compss, dislib, and qdislib are provided as aliases and can be used interchangeably with pycompss.
This tool allows users to deploy and manage multiple COMPSs infrastructures from a single interface, supporting four different environment types: local, remote, docker, and unicore.
The main help output displays the supported flags and available commands:
$ pycompss -h
usage: pycompss [-h] [-d] [-i] [-v] [-p] [-s] [-g]
            {tutorial,tut,environment,env,status,envs,activate,use,default,reset,wipe,dep_check,dc,install,ins,exec,e,run,r,monitor,m,jupyter,n,gengraph,gg,gentrace,gt,inspect,i} ...

==============
PyCOMPSs CLI
==============

A command-line tool to develop and run COMPSs applications with ease.

Run applications locally, in Docker, or on distributed infrastructures such as
clusters and supercomputers. The CLI handles environment setup, job submission,
and execution management for you.

Built for usability and reproducibility, it streamlines parallel and distributed
computing workflows using COMPSs.

Resources:
• COMPSs Website             : http://compss.bsc.es
• COMPSs Repository          : https://github.com/bsc-wdc/compss
• COMPSs Documentation       : https://compss.readthedocs.io/
• pycompss-cli Documentation : https://compss.readthedocs.io/en/stable/Sections/04_Ecosystem/09_CLI.html

Supported environments in this machine:
✔ local: Use local COMPSs installation.
✔ remote: Use a remote HPC COMPSs installation.
✘ docker: Docker environment NOT AVAILABLE.
    Install Docker and its Python bindings ('docker') in order to enable this environment type.
✘ unicore: UNICORE environment NOT AVAILABLE.
    Install 'pyunicore' in order to enable this environment type.

Current environment:
• Name : default
• Type : local

positional arguments:
{tutorial,tut,environment,env,status,envs,activate,use,default,reset,wipe,dep_check,dc,install,ins,exec,e,run,r,monitor,m,jupyter,n,gengraph,gg,gentrace,gt,inspect,i}
    tutorial (tut)      Configure the environment for COMPSs training.
    environment (env)   Manage COMPSs environments.
    status (envs)       Show current COMPSs environment status (alias of 'environment list').
    activate (use)      Activate a COMPSs environment (alias of 'environment change').
    default             Change to 'default' environment (alias of 'environment change default').
    reset (wipe)        Remove all COMPSs environments (reset state).
                        Next actions will be applied using the current environment:
    dep_check (dc)      COMPSs dependency checker.
    install (ins)       COMPSs install.
    exec (e)            Execute command within COMPSs environment.
    run (r)             Run application (with runcompss).
    monitor (m)         Start/stop monitor.
    jupyter (n)         Start Jupyter notebook.
    gengraph (gg)       Convert graph to PDF.
    gentrace (gt)       Merge traces to Paraver trace.
    inspect (i)         Inspect RO-Crate(s) from a COMPSs application run.

options:
-h, --help            show this help message and exit
-d, --debug           Enable debug mode.
-i, --info            Enable info mode.
-v, --version         Get version.
-p, --plain           Plain mode (no color).
-s, --sanitize        Avoid sensitive information in logs, out and err.
-g, --gui             Graphical interface.
As seen in the help output, pycompss-cli is organized into several functional groups to simplify the lifecycle of a COMPSs application:
Environment Management: Commands such as
environment,status, andactivateallow users to switch between different execution contexts (local, remote, docker, or unicore).Application Execution: The
runandexecactions are the primary entry points for executing COMPSs applications and scripts within the selected environment.Setup & Maintenance: Tools like
installanddep_checkensure that all necessary dependencies are present in the environment before execution.Analysis & Debugging: Advanced utilities such as
gengraph,gentrace, andinspectprovide insights into the application’s execution graph and performance traces.Interactive Development: Integration with
jupyterenables an interactive development process.Training: The
tutorialaction automatically creates and configures training environments.
Important
Not all environments support every action. Some environments may offer additional capabilities (e.g., remote environments provide app and job actions). Supported actions are displayed once the environment is active.
Tip
Most commands provide a short alias (e.g., env for environment, r for run) to speed up the workflow in the terminal.
Tip
A Graphical User Interface (GUI) is also available and can be launched with:
$ pycompss --gui
The GUI allows all actions to be performed via a mouse-driven interface.
Creating a New COMPSs Environment
First, navigate to your development directory:
mkdir pycompss_projects
cd pycompss_projects
New environments can be created in two ways:
Automatically using the
tutorial(tut) action:$ pycompss tutorial <TUTORIAL_NAME>
If
<TUTORIAL_NAME>is left empty, the generic PyCOMPSs tutorial Docker environment will be deployed.
Manually using the
environment(env) action:$ pycompss environment init
The system will prompt you for the necessary information (e.g., environment type, name, etc.).
Advanced environment initialization
Creates a local environment and initializes COMPSs in the current working directory.
$ pycompss environment init local
Alternatively, you can specify a custom working directory:
$ pycompss init local -w /home/user/replace/path/
Creates a Docker-based environment and deploys a COMPSs container.
$ pycompss environment init docker
Tip
This command initializes COMPSs in the current working directory, allowing you to share it with the container (develop locally and test within Docker), or in the WORK_DIR if the -w flag is set. You can specify the COMPSs Docker image to be used with the -i flag.
Important
For macOS users:
If the command pycompss init docker returns the following error:
"ERROR: Docker service is not running. Please, start docker service and try again"
Even if Docker is running correctly, this may be caused by pycompss-cli being unable to find the Docker socket in the default path.
To fix this: Open Docker Desktop > Settings > Advanced (in the left panel) > Enable default Docker socket.
Note
The first initialization requires downloading the Docker image from the repository, which may take some time.
Creates a remote environment where COMPSs is already available. You will be prompted for the required configuration.
$ pycompss environment init remote
Tip
You can use a configuration file to set up the remote environment using the --setup_file flag. For example, to load specific modules:
$ cat remote_setup.sh
module load python/3.12.1
module load COMPSs/3.4
module load <ANY_OTHER_MODULE>
$ pycompss environment init remote --setup_file remote_setup.sh
Creates a UNICORE environment where COMPSs is available. You will be prompted for the required configuration.
$ pycompss environment init unicore
Managing Environments
Environments can be managed using the following actions:
Listing: Check all available environments using
environment list(shortcuts:env l,status, orenvs).$ pycompss env list ┌──────────┬────────┬────────┐ │ Name │ Type │ Active │ ├──────────┼────────┼────────┤ │ test_env │ remote │ - │ │ tutorial │ docker │ - │ │ default │ local │ ✔ │ └──────────┴────────┴────────┘
Changing: Activate a specific environment using
environment change <NAME>(shortcuts:env c,activate, oruse). Usedefaultto switch back to the default environment.$ pycompss env change tutorial ⚠️ WARNING: The 'tutorial' container is not running. Starting... ⚠️ WARNING: No master container running. Starting pycompss-master-tutorial container in dir /home/user/temp This may take a while because it needs to download the docker image. Please be patient. ✔ Environment `tutorial` is now active
Analyzing: View the details of the currently active environment using
environment show(shortcut:env s).$ pycompss environment show ⚙️ Environment `tutorial` configuration: - name: tutorial - specific: - image: compss/compss-tutorial:3.4 - restart: True - privileged: False - update_image: False - master_ip: 172.17.0.3 - working_dir: /home/user/temp - log_dir: /home/user/temp/.COMPSs/ - env: docker 🛠️ Environment `tutorial` setup script: echo 'not needed'
Removing: Delete a specific environment using
environment remove <NAME>(shortcut:env r).$ pycompss environment remove test_env ⚠️ Are you sure to remove the 'test_env' environment? [y/n]: y Deleting environment `test_env`. ..
Resetting: Remove all configured environments using
resetorwipe(USE WITH CAUTION).$ pycompss reset ⚠️ The /home/user/temp/.COMPSs folder will be removed. Do you want to continue? [y/n]: y ⚠️ The /home/user/temp/.compss_docker_cfg file will be removed. Do you want to continue? [y/n]: y ⚠️ Are you sure to remove the 'tutorial' environment? [y/n]: y Removing current active environment. Changing to default environment. Environment `default` is now active Deleting environment `tutorial`. ..
Available Actions
The following table summarizes the available actions and their compatibility with different environment types. Note that not all actions are supported across all environments.
Action\Environment |
Local |
Docker |
Remote |
Unicore |
|---|---|---|---|---|
Check COMPSs dependencies ( |
✔ |
|||
Install COMPSs ( |
✔ |
|||
Execute command ( |
✔ |
✔ |
✔ |
|
Execute COMPSs application ( |
✔ |
✔ |
||
Manage application ( |
✔ |
✔ |
||
Manage job ( |
✔ |
✔ |
||
COMPSs Monitor ( |
✔ |
✔ |
✔ |
|
Jupyter Notebook ( |
✔ |
✔ |
✔ |
|
Generate the task graph ( |
✔ |
✔ |
✔ |
|
Tracing applications/notebooks ( |
✔ |
✔ |
✔ |
|
Add/Remove COMPSs workers ( |
✔ |
|||
Inspect workflow provenance ( |
✔ |
✔ |
Checking COMPSs Dependencies
This action verifies the COMPSs dependencies within the active environment. It is critical to ensure that all required dependencies are installed before attempting to install COMPSs to avoid errors.
Since COMPSs supports multiple programming languages, the dependency check can be performed using different profiles.
$ pycompss dep_check
❓ Select your profile [minimal | full | Python | C | custom] (default: Python): Python

SYSTEM PACKAGES
---------------
✔ java (21.0.1)
✔ uuidgen (2.31.1)
✔ ssh (15.0)
✔ autoreconf (2.69)
✔ libtool (15.0)
✔ gfortran (7.4.1)
✔ libxml2-dev (15.0)
✔ make (4.2.1)
✔ build-essential (15.0)
✔ python (3.12.13)
✔ python3-pip (26.0.1)
✔ python3-dev (15.0)

OTHER PACKAGES
--------------
✔ docker (26.1.5)
⚠ nodejs [OPTIONAL] NodeJS>=12 Required for the new COMPSs monitor

PYTHON PACKAGES
---------------
✔ setuptools (84.0.0)
✔ wheel (0.47.0)
✖ cython
✔ dill (0.4.1)
⚠ guppy3 [OPTIONAL] Enables the memory usage reporting
⚠ tabulate [OPTIONAL] Enables the runtime status data tables in notebooks
⚠ matplotlib [OPTIONAL] Enables the runtime status plots in notebooks and the object tracker report plot
⚠ numpy [OPTIONAL] Enables the runtime status information in notebooks
✔ memory_profiler (0.61.0)
⚠ mpi4py [OPTIONAL] Enables the usage of the MPI Python worker
✔ mypy (2.3.1)
✔ jupyter (2.3.1)
✔ jupyterlab (4.6.3)

R PACKAGES
----------

ENVIRONMENT VARIABLES
---------------------
✔ JAVA_HOME

---------------------------------------
| Missing REQUIRED dependencies detected |
------------------------------------------
HINT! Here are the commands to install them:
python3 -m pip install "cython"

------------------------------------------
| Missing OPTIONAL dependencies detected |
------------------------------------------
HINT! Here are the commands to install them:
sudo zypper install nodejs
python3 -m pip install "guppy3>=3.0.1"
python3 -m pip install "tabulate>=0.8.8"
python3 -m pip install "matplotlib>=3.5.0"
python3 -m pip install "numpy>=2.2.0"
python3 -m pip install "mpi4py>=3.1.1"

⚠️  Do you want to attempt to install REQUIRED missing dependencies? [y/n]: n
⚠️  Do you want to attempt to install OPTIONAL missing dependencies? [y/n]: n

☠️  ERROR: Missing REQUIRED dependencies found! ❌
The output indicates whether the system meets all required dependencies. If not, it specifies which are missing, their importance (mandatory vs. optional), and provides the commands to install them.
Installing COMPSs
This action installs COMPSs within the active environment. The dependency check must be successful before the installation can proceed.
$ pycompss install
❓ Select the installation profile [full | minimal | C | Python | R] (default: Python): Python
Installing COMPSs with profile: Python
1. Check dependencies...

SYSTEM PACKAGES
---------------
✔ java (21.0.1)
✔ uuidgen (2.31.1)
✔ ssh (15.0)
✔ autoreconf (2.69)
✔ libtool (15.0)
✔ gfortran (7.4.1)
✔ libxml2-dev (15.0)
✔ make (4.2.1)
✔ build-essential (15.0)
✔ python (3.12.13)
✔ python3-pip (26.0.1)
✔ python3-dev (15.0)

OTHER PACKAGES
--------------
✔ docker (26.1.5)
⚠ nodejs [OPTIONAL] NodeJS>=12 Required for the new COMPSs monitor

PYTHON PACKAGES
---------------
✔ setuptools (84.0.0)
✔ wheel (0.47.0)
✔ cython (3.3.0)
✔ dill (0.4.1)
⚠ guppy3 [OPTIONAL] Enables the memory usage reporting
⚠ tabulate [OPTIONAL] Enables the runtime status data tables in notebooks
⚠ matplotlib [OPTIONAL] Enables the runtime status plots in notebooks and the object tracker report plot
⚠ numpy [OPTIONAL] Enables the runtime status information in notebooks
✔ memory_profiler (0.61.0)
⚠ mpi4py [OPTIONAL] Enables the usage of the MPI Python worker
✔ mypy (2.3.1)
✔ jupyter (2.3.1)
✔ jupyterlab (4.6.3)

R PACKAGES
----------

ENVIRONMENT VARIABLES
---------------------
✔ JAVA_HOME

------------------------------------------
| Missing OPTIONAL dependencies detected |
------------------------------------------
HINT! Here are the commands to install them:
sudo zypper install nodejs
python3 -m pip install "guppy3>=3.0.1"
python3 -m pip install "tabulate>=0.8.8"
python3 -m pip install "matplotlib>=3.5.0"
python3 -m pip install "numpy>=2.2.0"
python3 -m pip install "mpi4py>=3.1.1"

⚠️  Do you want to attempt to install OPTIONAL missing dependencies? [y/n]: n

All REQUIRED dependencies satisfied! ✅
❓ 🏷️  Which COMPSs version? (default: 3.4):
COMPSs version: 3.4
2. Downloading package...
Downloading [██████████████████████████████] 100.0% (863.6 MB / 882.2 MB) | 57.7 MB/s
3. Extracting package...
Extracting  [█████████████████████████░░░░░]  84.8% (20.6 KB / 24.3 KB) | 2.3 KB/
...
...
...
During this process, the tool will prompt you for details such as the COMPSs version and the installation path.
Executing Commands
This action executes a given command (and its parameters) within the active environment.
For example, in a local environment:
$ pycompss exec whoami
user
In a Docker environment:
$ pycompss exec whoami
root
Executing Applications with COMPSs
This action runs a specified application and its parameters using COMPSs within the active environment.
$ # pycompss run [COMPSs FLAGS] [APPLICATION] [APPLICATION PARAMETERS]
$ pycompss run --graph --tracing examples/mandelbrot/src/mandel.py 2
[...]
Managing Applications (Remote)
Remote environments require applications to be deployed before they can be executed. The app argument provides tools for deploying, listing, and removing applications (available only when a remote environment is active).
Deploying an Application
The app deploy action copies the current directory to the remote machine, making it ready for execution as a job in the queuing system.
$ pycompss app deploy notebooks
Deploying app...
Tip
Use the --overwrite flag to re-deploy an application and overwrite existing remote contents.
Listing Applications
You can view all deployed applications in the remote environment using the app list action:
$ pycompss app list
┌───────────┐
│ Name      │
├───────────┤
│ notebooks │
└───────────┘
Removing an Application
Remove an application from the remote machine using the app remove action:
$ pycompss app remove notebooks
⚠️  Are your sure that you want to remove notebooks app? [y/n]: y
Application `notebooks` removed successfully
Managing Jobs (Remote)
Remote environments execute applications via a job management system (e.g., SLURM). The job action allows users to submit, monitor, cancel, and review the history of these jobs.
Submitting a Job
Use job submit to launch the execution of a COMPSs application. Note that the application must be deployed first.
$ # pycompss job submit --app_name [APPLICATION NAME] [ENQUEUE_COMPSS_FLAGS] [APLICATION MAIN FILE] [APPLICATION FLAGS]
$ pycompss job submit --app_name examples --exec_time=10 --qos=debug --num_nodes=2 --project_name=bsc main.py 2 3
[...]
1234 # [JOB_IDENTIFIER]
Checking Job Status
Consult the current status of a job (e.g., running, waiting) using the job status action:
$ # pycompss job status [JOB_IDENTIFIER]
$ pycompss job status 1234
RUNNING
Canceling a Job
If an issue is detected, a job can be canceled while it is waiting or running via the job cancel action:
$ # pycompss job cancel [JOB_IDENTIFIER]
$ pycompss job cancel 1234
Listing Current Jobs
View all jobs currently in the queue or in execution using the job list action:
$ pycompss job list
[...]
Reviewing Job History
Check the history of all submitted jobs using the job history action:
$ pycompss job history
[...]
Tip
You can limit the history to a single job by specifying the --job_id flag followed by the job identifier.
COMPSs Monitor
The COMPSs monitor can be started in the active environment using the pycompss monitor start command. This enables real-time monitoring of the application status. Once started, the tool will provide a URL to access the monitor via a web browser (e.g., http://127.0.0.1:8080/compss-monitor).
Important
Include the --monitoring=<REFRESH_RATE_MS> flag in the execution command before the binary to be executed.
$ pycompss monitor start
$ pycompss run --monitoring=1000 -g matmul_files.py 4 4
$ # During the execution, go to the URL in your web browser
$ pycompss monitor stop
When running a notebook, simply add the monitoring parameter to the COMPSs runtime start call. To stop the monitoring facility, use the pycompss monitor stop command.
Tip
The new monitor can be used instead of the traditional one by adding the --new_monitor flag. Note that this requires Docker or Apptainer to be available in the active environment.
Jupyter Notebooks
Jupyter notebooks can be launched using the pycompss jupyter command. Run the following snippet from the project root:
$ cd tutorial_apps/python
$ pycompss jupyter ./notebooks
You can then access the notebook interactively by opening the provided URL (e.g., http://127.0.0.1:8888/) in your web browser.
To run a Jupyter notebook on a remote environment, it must be bound to a previously deployed application:
$ pycompss jupyter --app_name notebooks --exec_time=20 --qos=gp_debug --num_nodes=1 --project_name=bsc
Job submitted: 19320191
Waiting for jupyter to start...
Connecting to jupyter server...
Connection established. Please use the following URL to connect to the job.
http://localhost:8888/?token=35199bb8917a97ef2ed0e7a97fbfb6e4c727983bb3a87483
Ready to work!
To force quit: CTRL + C
Inside the notebook, PyCOMPSs must be imported and the runtime started. For more details, please refer to the following resources:
Caution
If the job’s walltime is reached, the queuing system will kill the job, and the notebook will stop working.
To finish your session, press CTRL+C in the console where you launched the pycompss jupyter command to trigger the job cancellation.
Generating the Task Graph
COMPSs can produce a task graph showing the dependencies respected during execution. To generate it, include the --graph flag in the execution command:
$ cd python/matmul_files/src
$ pycompss run --graph matmul_files.py 4 4
Once the application finishes, the graph is stored in the .COMPSs\app_name_XX\monitor\complete_graph.dot file. This .dot file can be converted to PDF (or other formats) for easier visualization using the gengraph action:
$ pycompss gengraph .COMPSs/matmul_files.py_01/monitor/complete_graph.dot
The resulting PDF will be stored in the same folder as the .dot file.
Tracing Applications and Notebooks
COMPSs can produce tracing profiles of application execution using EXTRAE. To enable this, include the --tracing flag in the execution command:
$ cd python/matmul_files/src
$ pycompss run --tracing matmul_files.py 4 4
If running a notebook, simply add the tracing parameter to the pycompss jupyter call. Once the application finishes, the trace is stored in the ~\.COMPSs\app_name_XX\trace folder and can be analyzed with Paraver.
In remote environments, the trace folder contains a set of tar.gz files. To process and merge these into final trace files (prv, pcf, and row), use the gentrace action:
$ pycompss gentrace ~\.COMPSs\app_name_XX\trace
Adding and Removing COMPSs Workers
The pycompss-cli can add or remove worker nodes in Docker environments using the components argument. Use list to view current containers, add to add new worker containers, and remove to delete a worker. These actions can be performed before running an application.
Listing Nodes
$ pycompss components list
pycompss-master-tutorial
Adding Nodes
Note
Adding nodes is currently in the beta phase. Please report issues or suggestions on Github.
To add computing nodes, specify the number of workers to be added. For example, to add 2 Docker workers:
$ pycompss components add worker 2
Started 2 worker/s
Working dir: /home/user/examples
CPUs: 4
You can verify the new nodes are active with:
$ pycompss components list
pycompss-master-tutorial
pycompss-worker-tutorial-9ab82397
pycompss-worker-tutorial-7c0a9326
Removing Nodes
Note
Removing nodes is currently in the beta phase. Please report issues or suggestions on Github.
To remove computing nodes, specify the number of workers to be removed. For example, to remove 1 Docker worker:
$ pycompss components remove worker 2
Removed 1 workers.
Verify the removal with:
$ pycompss components list
pycompss-master-tutorial
pycompss-worker-tutorial-7c0a9326
Inspect Workflow Provenance
As detailed in the 🕵 Workflow Provenance section, COMPSs can generate workflow provenance as metadata stored using the RO-Crate specification.
The pycompss inspect command reads an existing RO-Crate and prints its content in a user-friendly format. The RO-Crate can be a subdirectory or a zip file containing the ro-crate-metadata.json file in its root. Note that Docker and Remote options for this command are not yet implemented.
The inspect option supports several specific flags:
$ pycompss inspect -h
usage: pycompss inspect ro_crate [ro_crate ...] [-v] [-d] [-f] [-m [METHODS ...]] [-t [TASKS]]
positional arguments:
ro_crate              Folder or zip file(s) containing the RO-Crate(s)
options:
-h, --help            show this help message and exit
-v, --verbose         Print extra information about tasks
-d, --data_assets     Print data assets
-f, --failing_tasks   Print info about failing tasks only
-t [TASKS ...], --tasks [TASKS ...]
                        Print all information about one or more tasks (e.g. 4 7 10-11 15-18
-m [METHODS ...], --methods [METHODS ...]
                        Print all tasks executing the specified method(s)
By default, the output displays the application’s Name, Description, Authors (name, organization, and email), License, and Date Published. It also identifies the Main entity (main file) and the Programming language and version used.
In the Execution details section, it shows the run Status, a summary of Executed Tasks, the total Execution Time, and the Host (hostname, number of nodes, and job ID if a queuing system was used). Resource Usage provides the average CPU and Memory percentage used by the nodes (excluding the master). The Agent field identifies the individual who executed the application.
Tip
Wildcards can be used with pycompss inspect to retrieve details for multiple runs simultaneously. You can also filter the output using grep (e.g., pycompss inspect *.zip | grep -e CRATE -e "Execution Time").
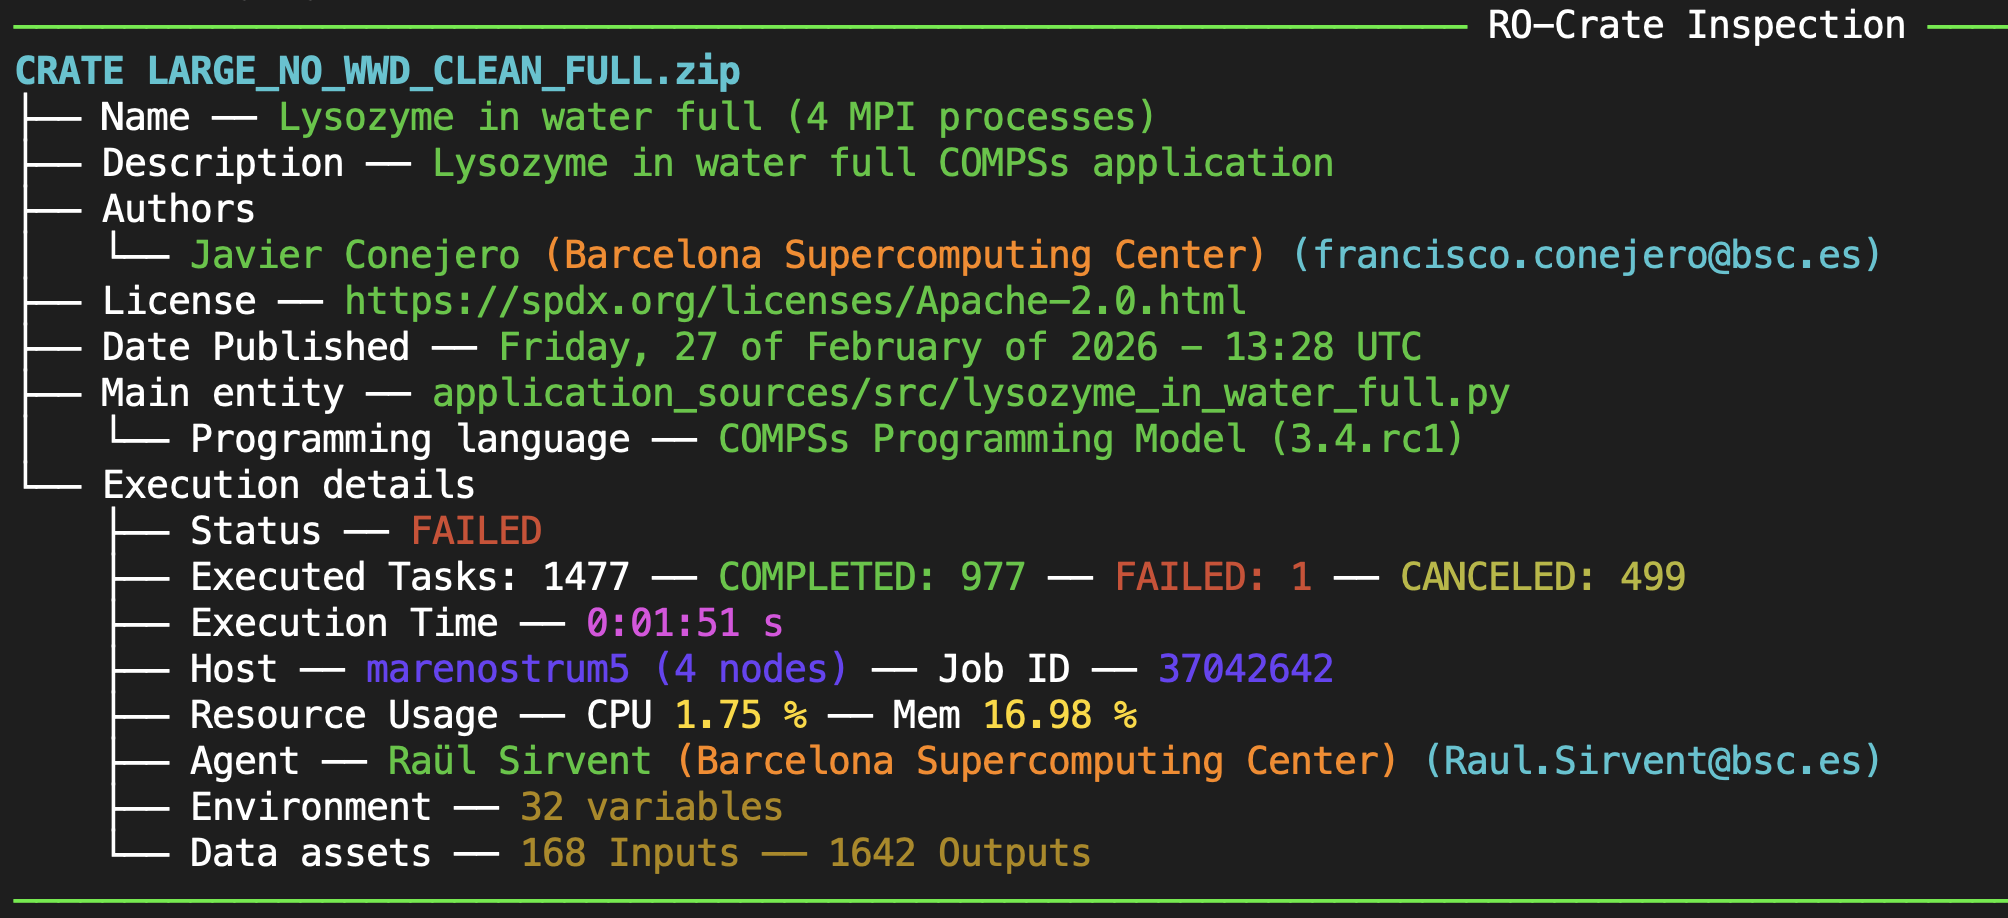
Figure 63 Inspect without flags
Verbose Mode
The -v/--verbose flag prints detailed general information. Specifically, the Software Requirements and RO-Crate compliance fields are added to the general description.
The Execution details are significantly expanded to include:
Start and End Time in UTC format.
Submission: The exact command used to run the experiment.
Environment: Relevant environment variables captured during execution.
Resource Usage: Detailed statistics per node, including method-specific performance.
The Overall Statistics section provides a breakdown of all executed methods: number of invocations, and average, maximum, and minimum execution times in milliseconds. It also provides average CPU and memory usage across all worker nodes. Finally, it lists details per node (hostname and tasks executed), providing per-method statistics and resource usage (avg/max CPU and avg/max/min memory). This is highly useful for identifying performance bottlenecks or load imbalance between nodes.
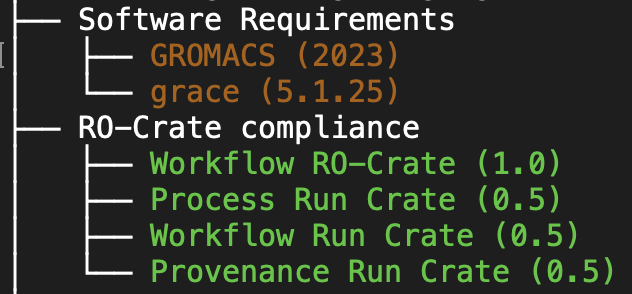
Figure 64 Inspect extra general details
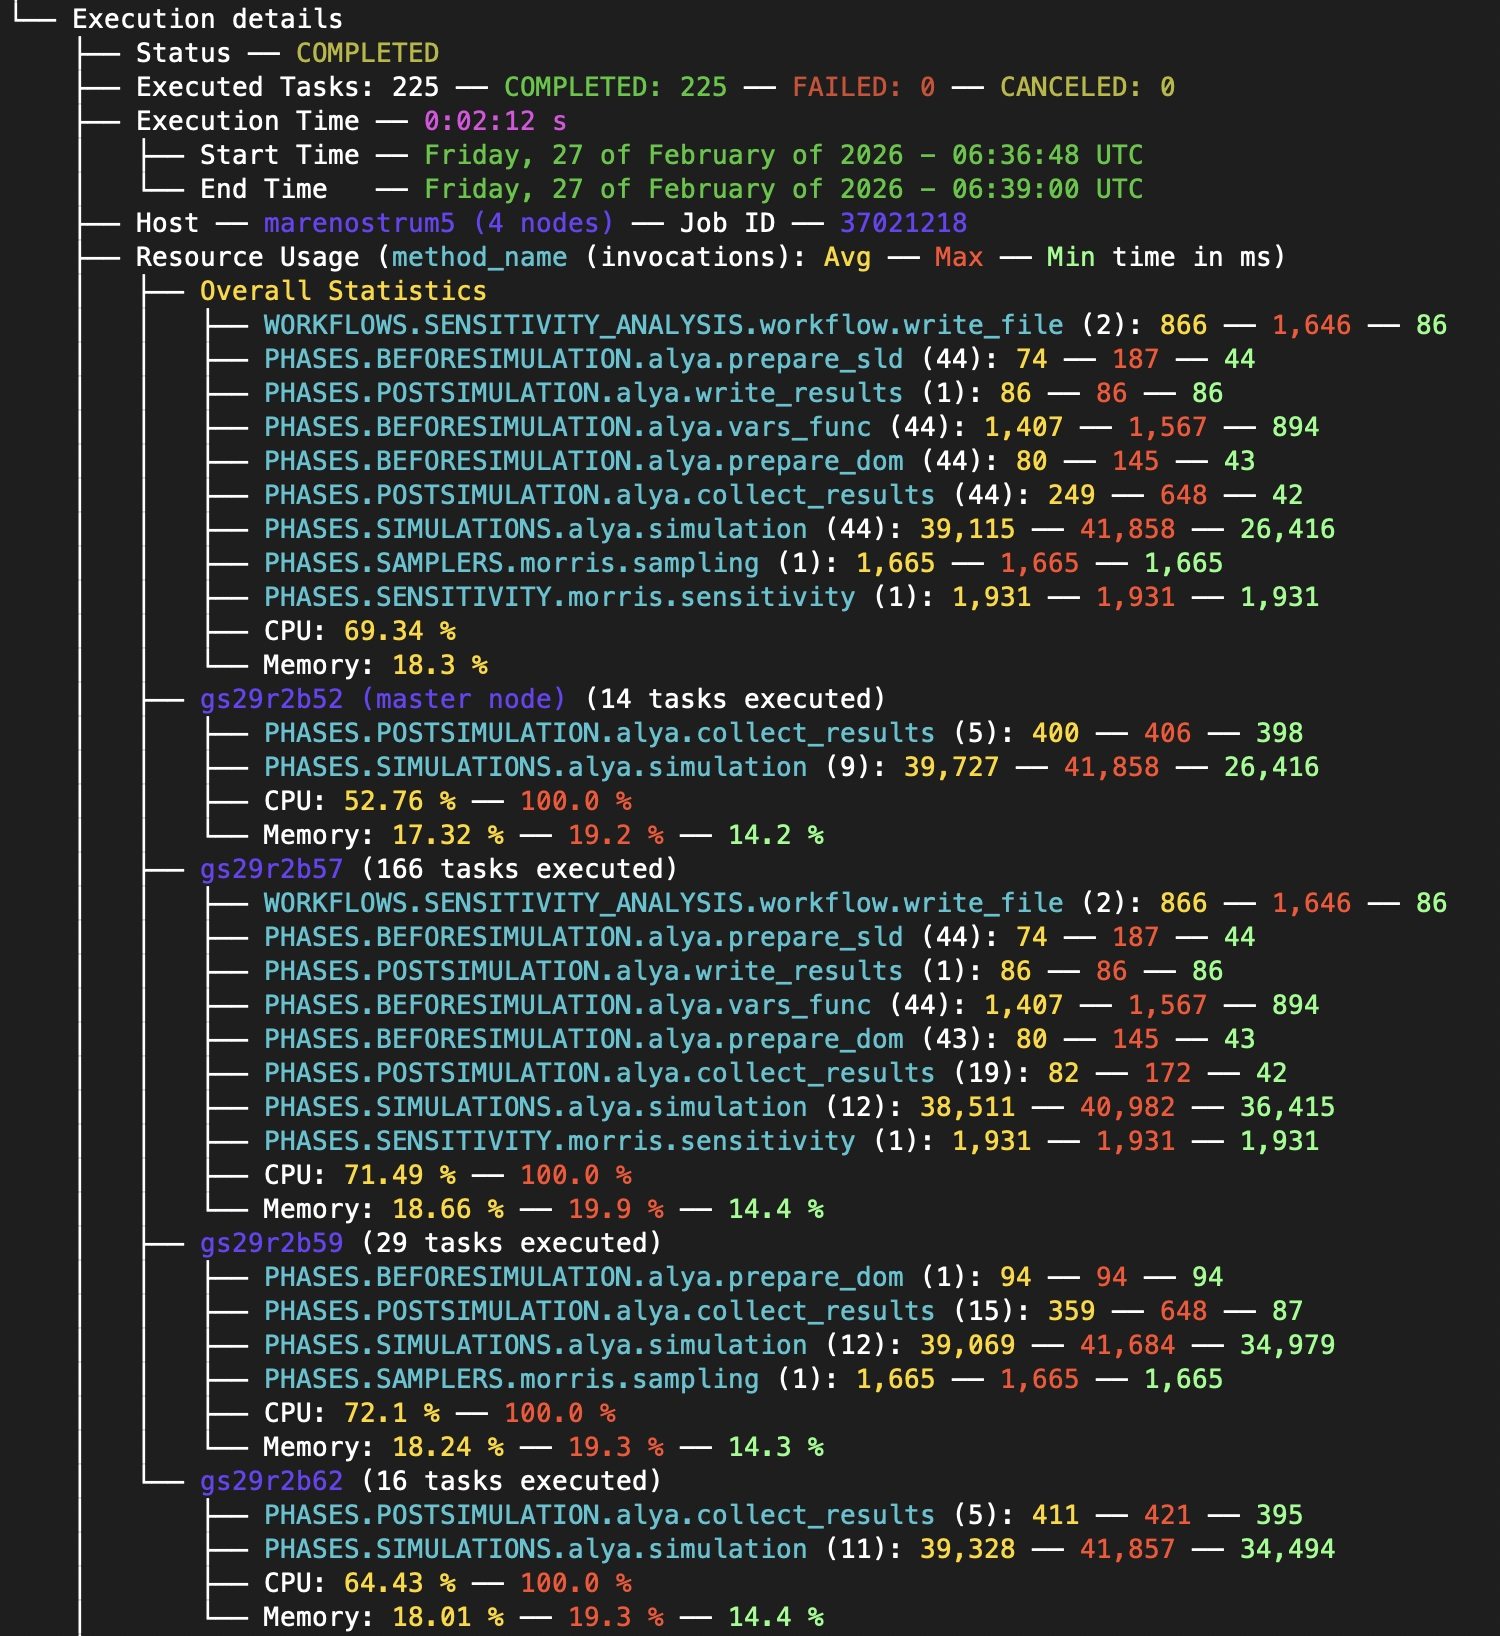
Figure 65 Inspect verbose, providing method and resource usage statistics
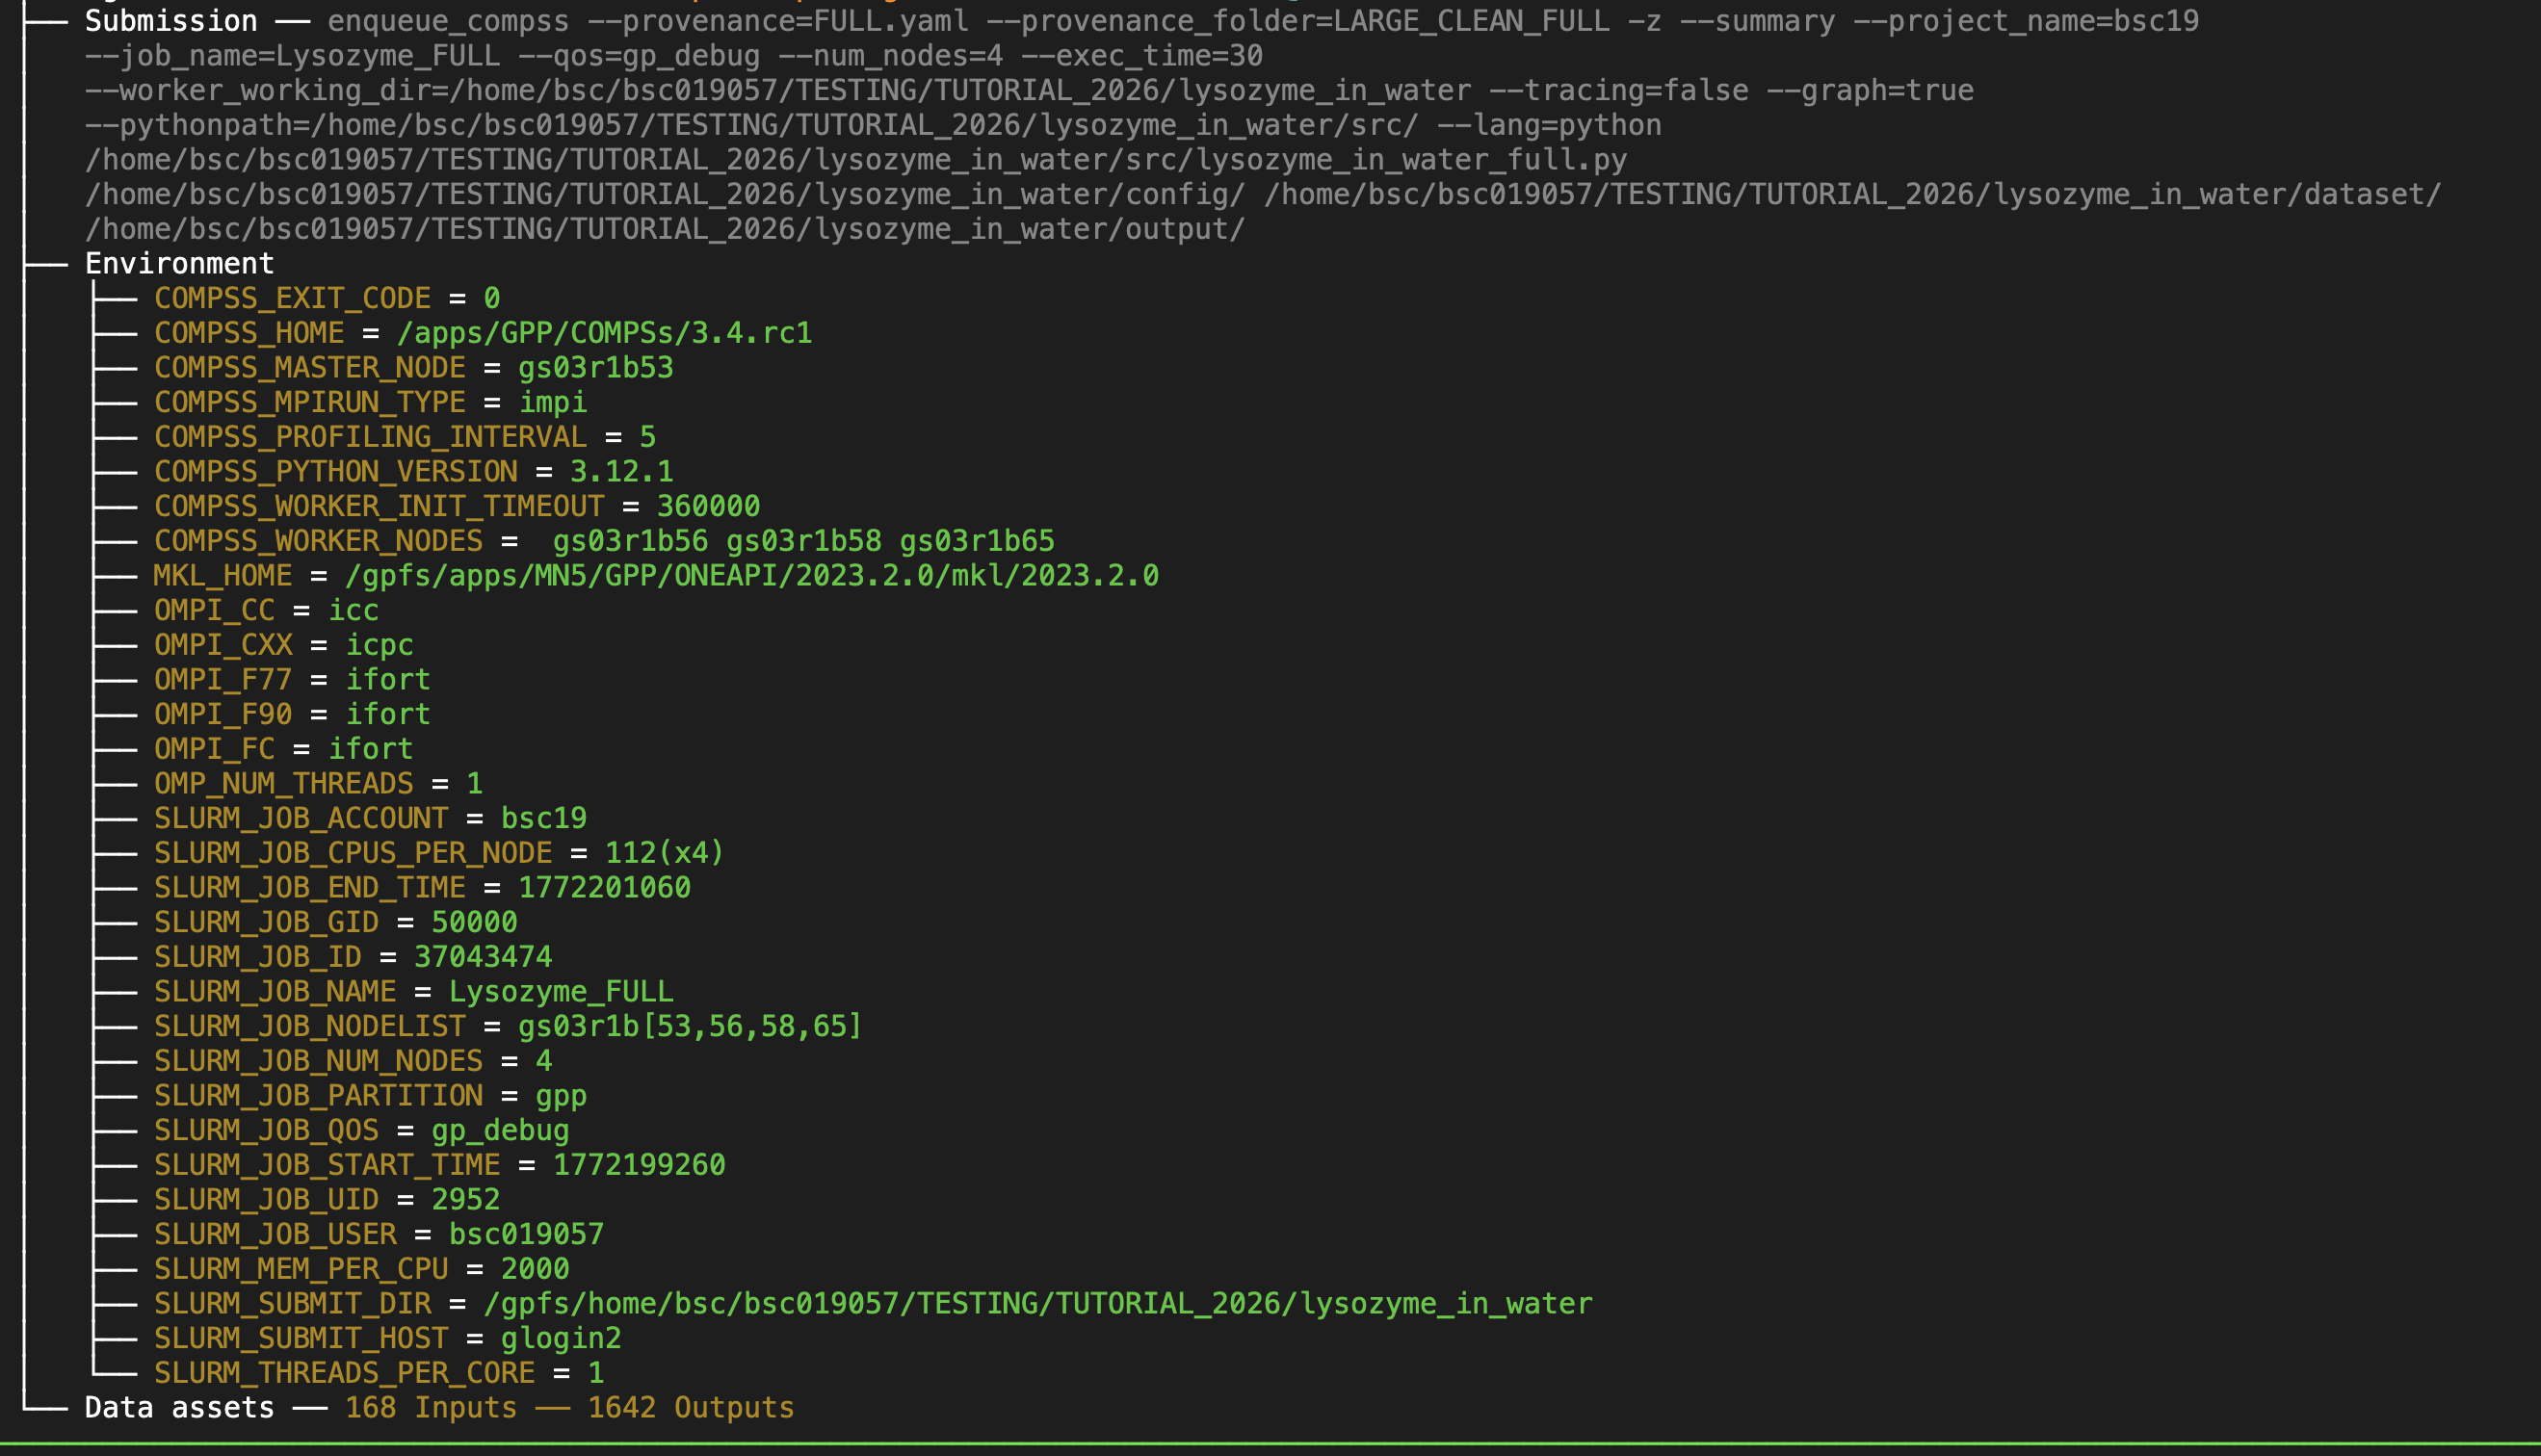
Figure 66 Detail on submission command and environment variables inside the Execution details section
Listing Data Assets
The -d/--data_assets flag provides details on the inputs used and outputs generated. This is disabled by default because large experiments can produce an overwhelming number of files. Each asset is specified by a relative path (if persisted in the crate) or a URL. For directories, only the root name is listed; for files, the size is also shown.
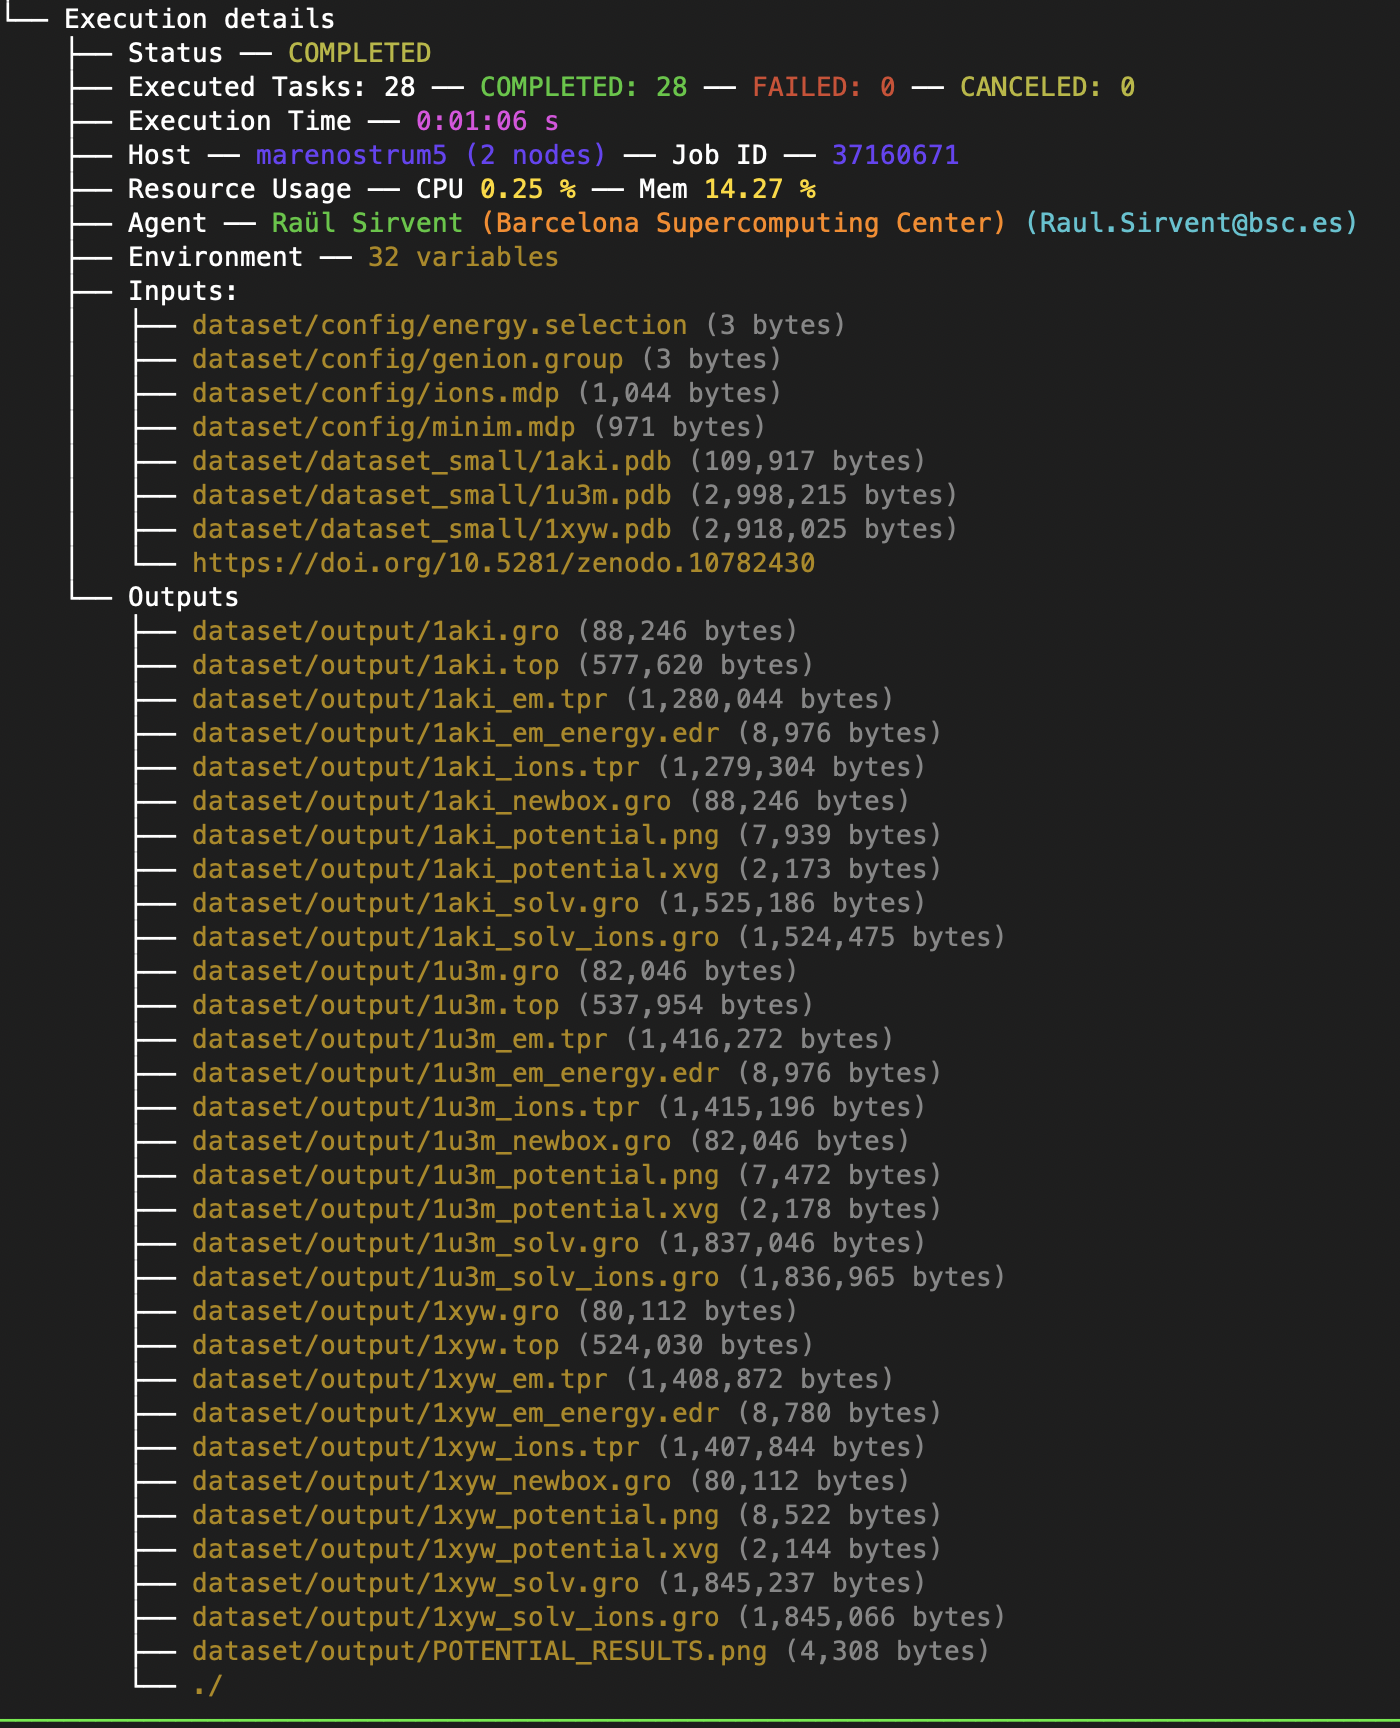
Figure 67 Detail on datasets needed (Inputs) and generated (Outputs) by the workflow application. Since relative paths are used, the datasets are persisted in the crate
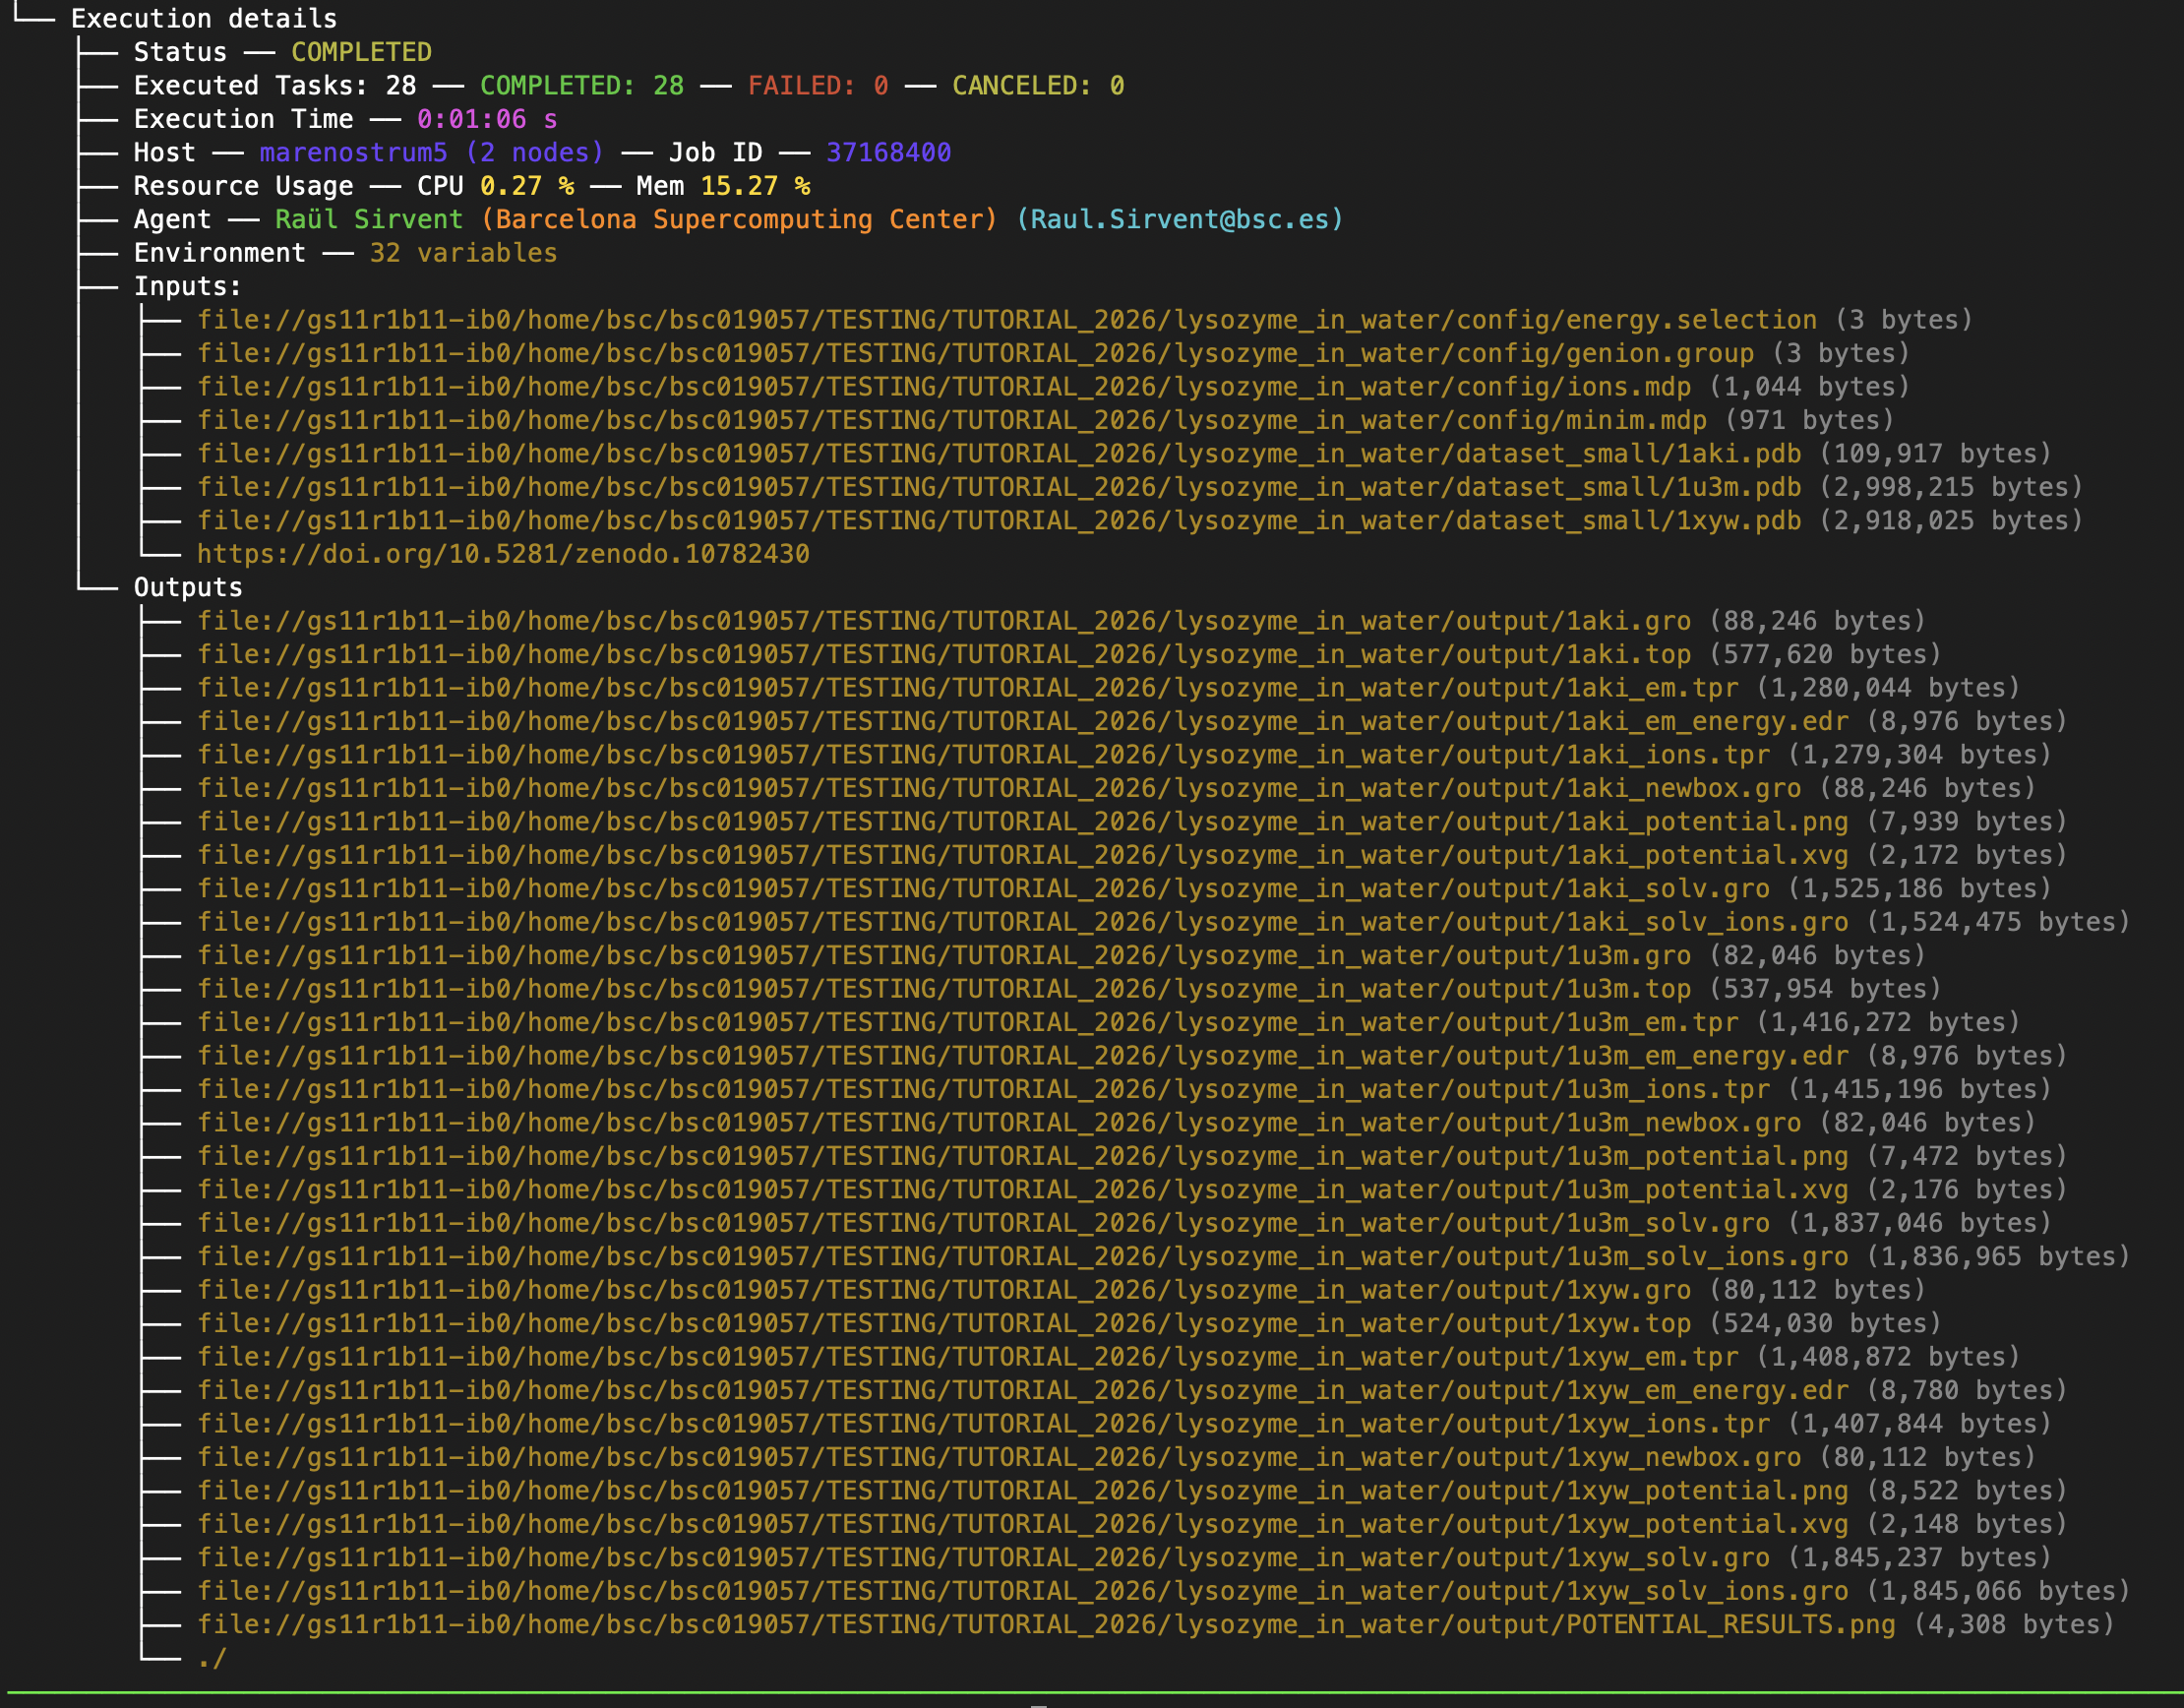
Figure 68 Detail on datasets needed (Inputs) and generated (Outputs) by the workflow application. Since URLs are used, the datasets are not persisted in the crate
Task Details by ID
The -t/--tasks flag prints detailed information for specific tasks. It accepts individual IDs (e.g., 3 4 10), ranges (e.g., 20-30), or combinations of both.
Details include status, the method executed, execution time, the host, and parameters (with their type and value). The Type field shows the schema.org mapping followed by the original programming model type (e.g., float64, dict). For failed or canceled tasks, output parameters are not listed as they are unreliable. In these cases, the Execution Time represents the time elapsed before the failure occurred.
Tip
We STRONGLY recommend using the workflow diagram (complete_graph.svg) to identify task ID numbers before using the -t flag.
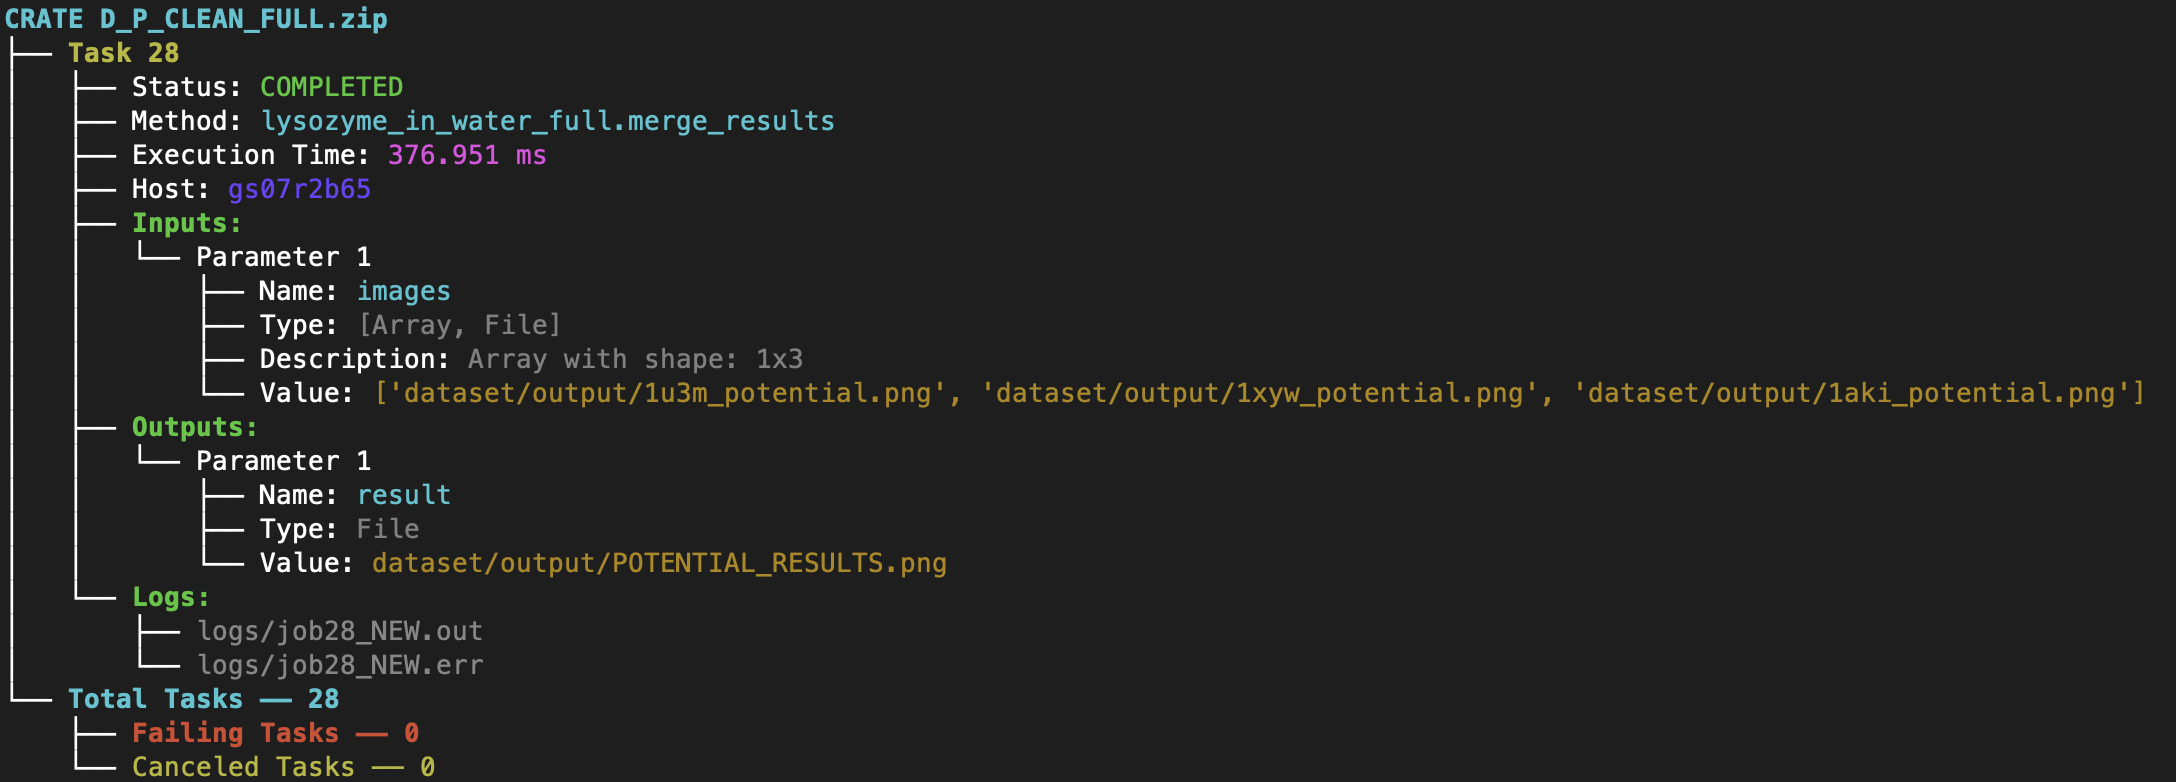
Figure 69 Task details: examples on Array of Files and File parameters. Corresponding task execution log files are also listed
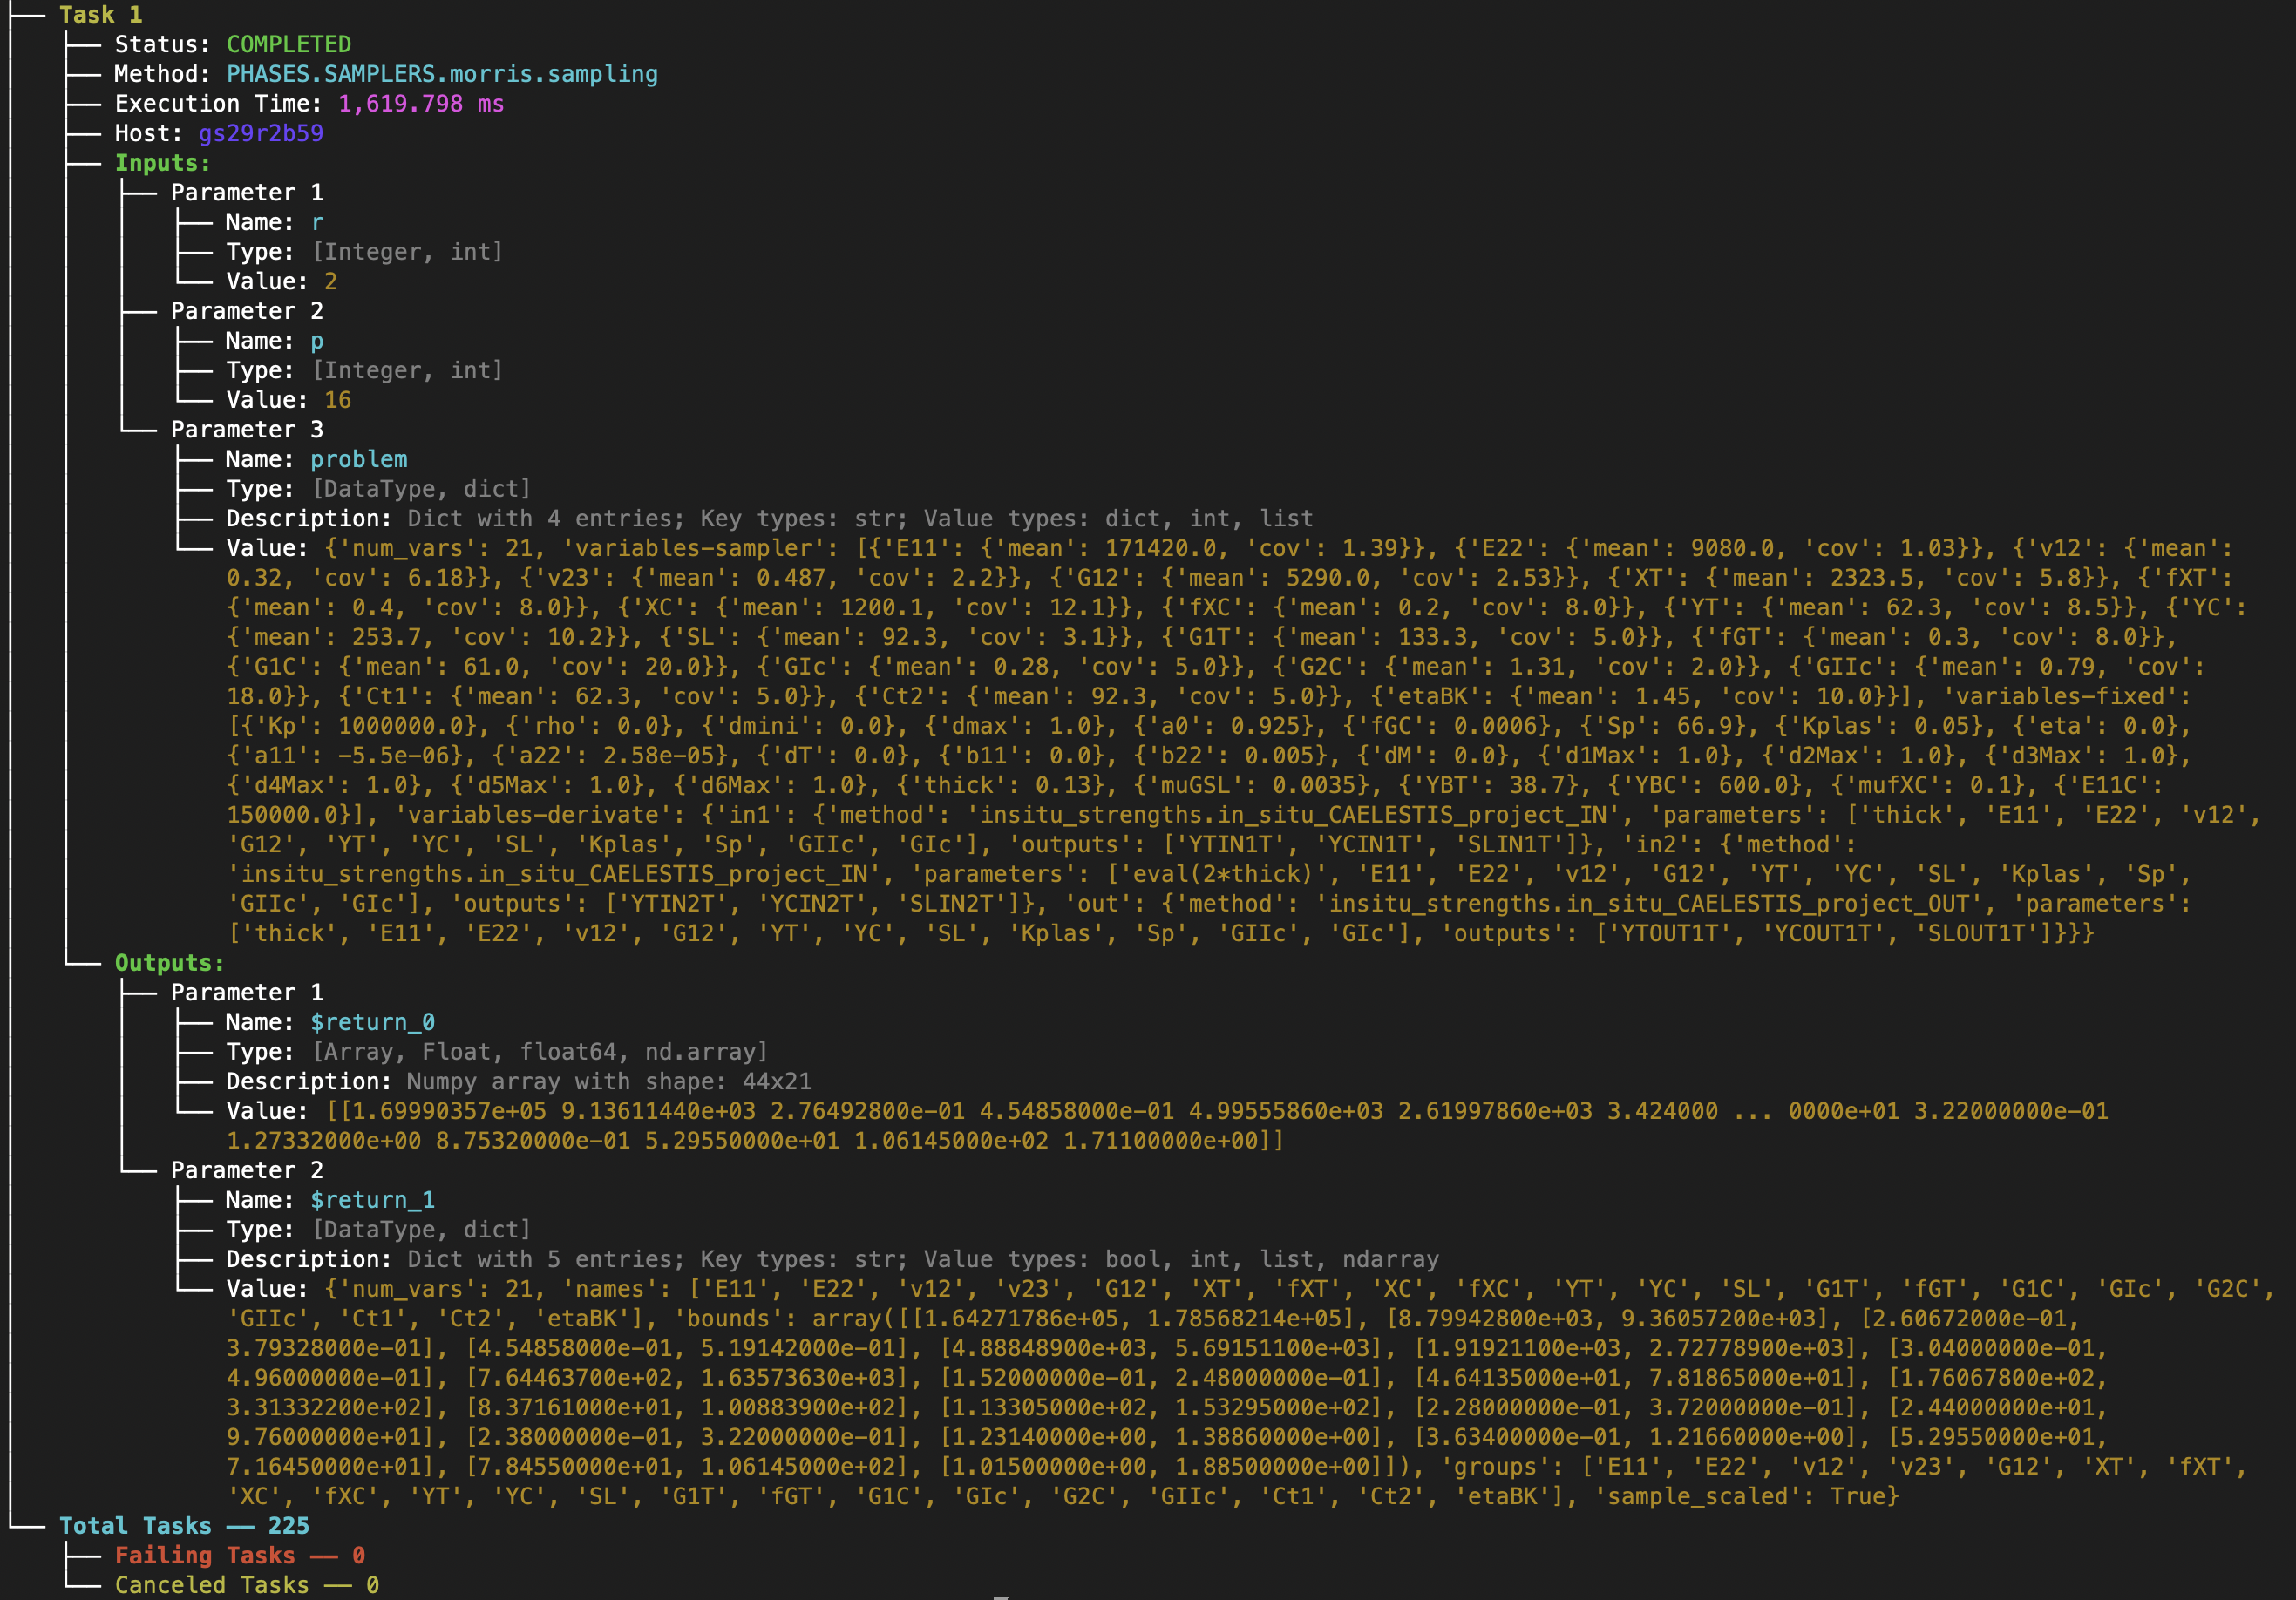
Figure 70 Task details: examples with Integer, Dictionary and Numpy array parameters
Task Details by Method Name
Similarly to the -t flag, the -m/--methods flag filters tasks by the name of the method they executed. This flag accepts a single pattern.
Failing Tasks
The -f/--failing_tasks flag lists only the tasks that failed during execution. Since provenance is generated regardless of outcome, this is an essential tool for debugging. Failing tasks always include their related execution logs and the exact input values used, allowing users to pinpoint the source of the error.
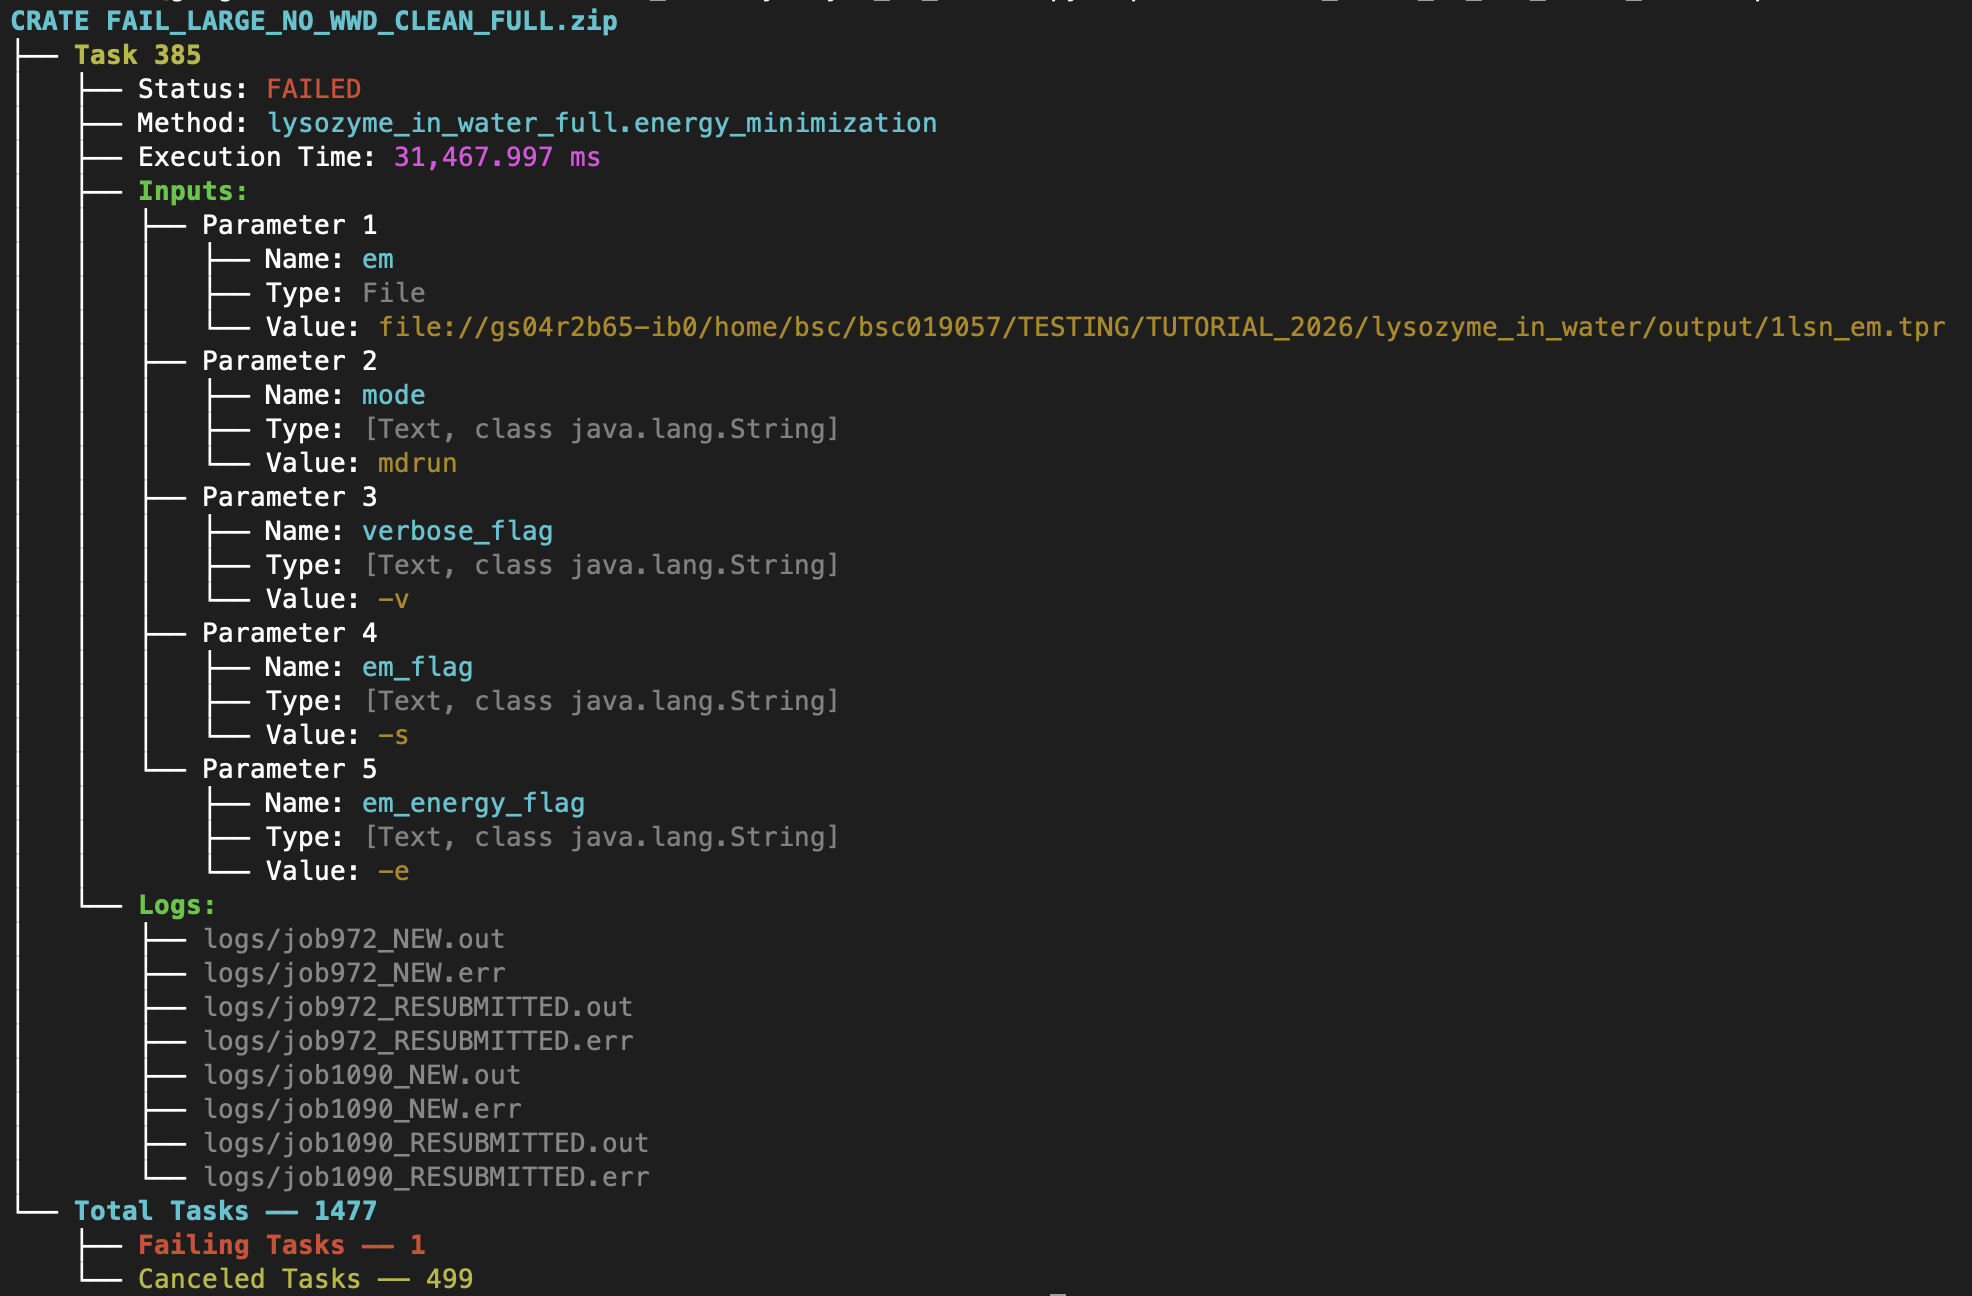
Figure 71 Details on Task 385 that failed. We can see that both Inputs and execution logs are indicated so the user can check them to look for errors
Compatibility with other WMSs
Because it is compliant with RO-Crate (specifically the Workflow Run and Provenance Run profiles), the pycompss inspect functionality is interoperable with other Workflow Management Systems (WMSs) that generate metadata in this format.
Examples include: CWL, Nextflow, Galaxy, Autosubmit, WfExS, Streamflow, Snakemake, Sapporo, and others. Note that the level of detail printed may vary depending on the amount of metadata provided by the source WMS.
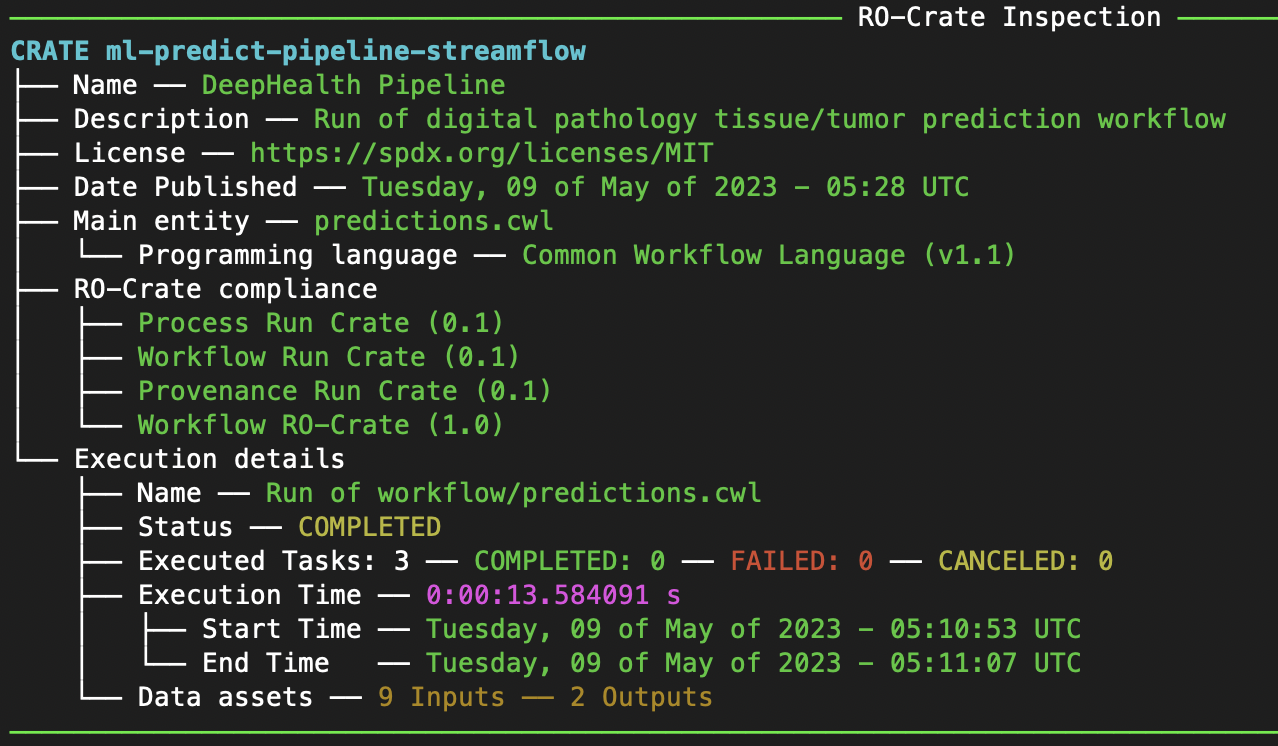
Figure 72 Streamflow pipeline details obtained with pycompss inspect
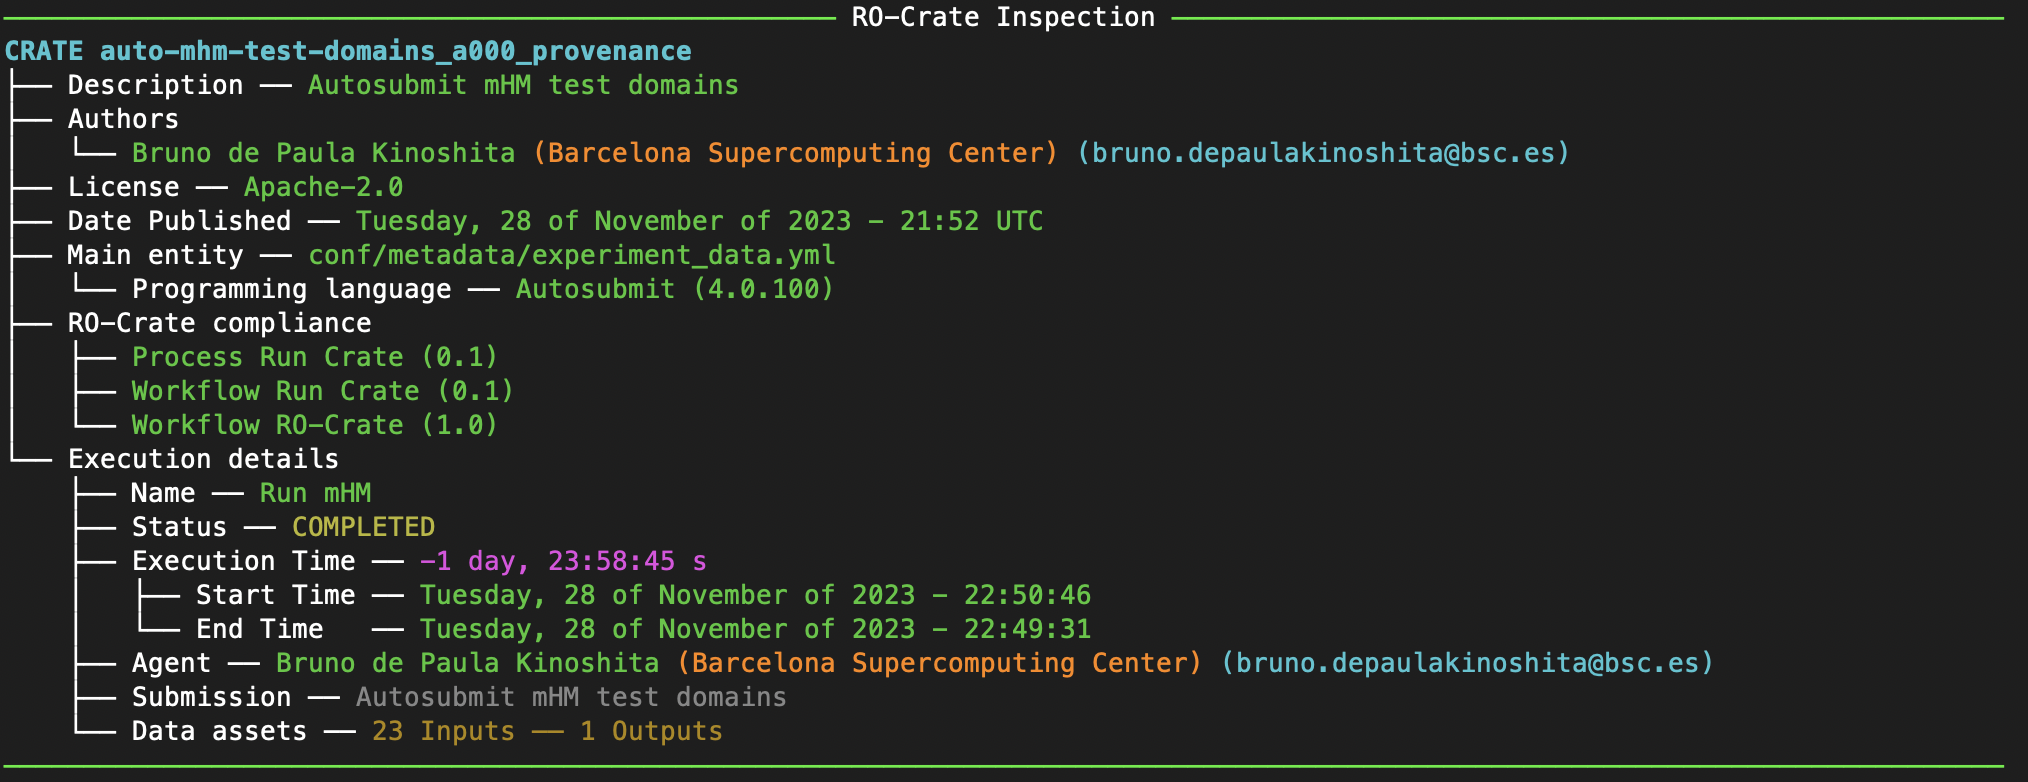
Figure 73 Autosubmit pipeline details obtained with pycompss inspect
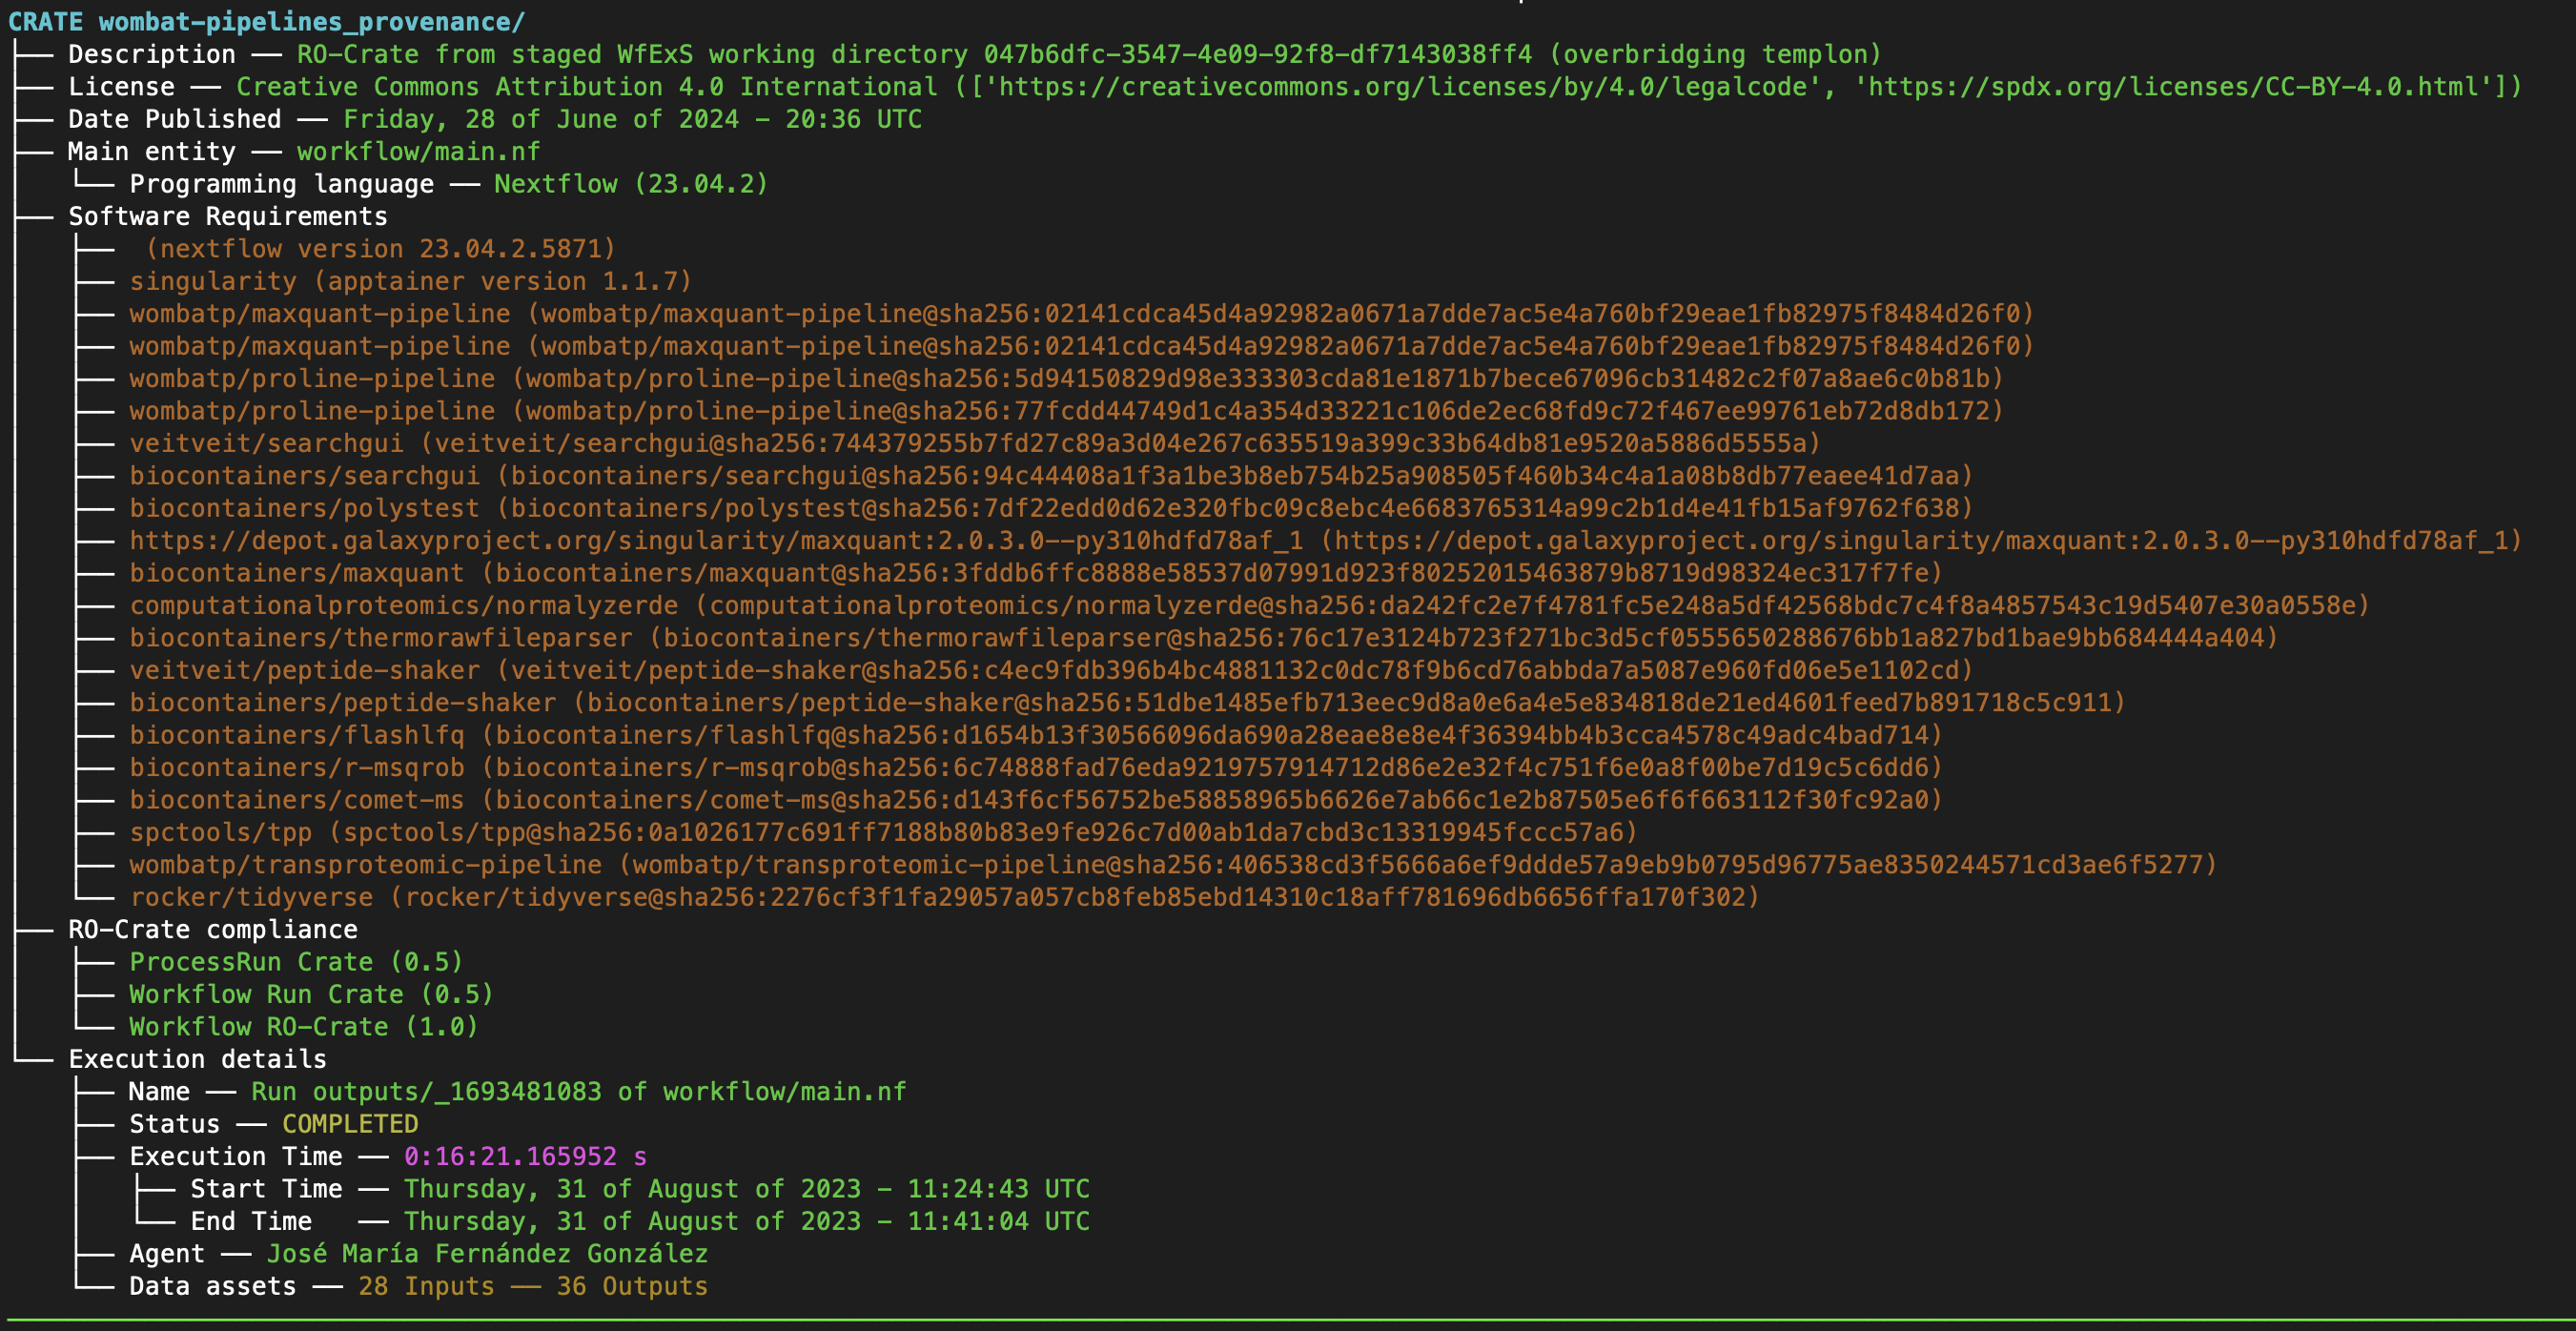
Figure 74 WfExS pipeline details obtained with pycompss inspect